
Bold Blonde Highlights from Aveda

Advertisement
Advertisement
Bold Blonde Highlights from Aveda
HOW-TO STEPS 
-
 1
1HIGHLIGHT FORMULA: Enlightener™ Powder Lightener + 20-volume Color Catalyst™ Creme Developer
Note: To create a highly-textured look, mix density of weaves and slices, working through hair to lighten 80% of natural color. This can be achieved by randomly leaving out bits of natural hair.
-
 2
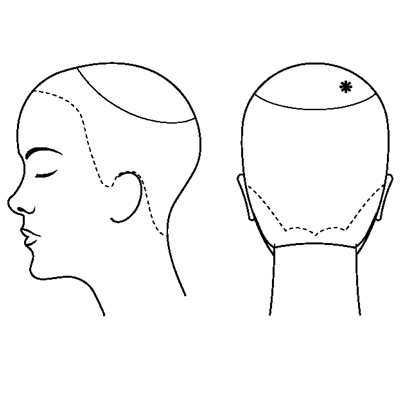
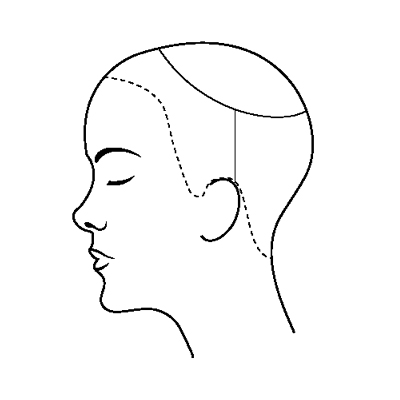
2Create a circular panel at top of head, as shown above. Circle should sit approximately three inches back from front hairline, depending on size of fringe and point of distribution.
-
 3
3Subdivide hair with a vertical parting from circular panel to top-of-ear on both sides of head.
-
 4
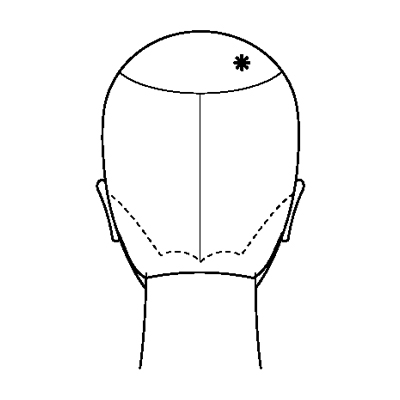
4Divide back panel in a separate vertical parting from the circle panel to the nape. Divide and clip away the front fringe section.
-
 5
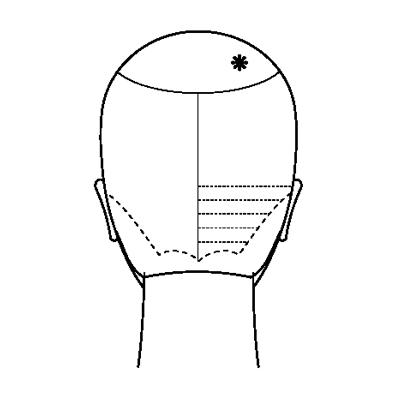
5Starting at nape, apply foils with the Highlight Formula, horizontally up toward the circular section, through entire back of head.
-
 6
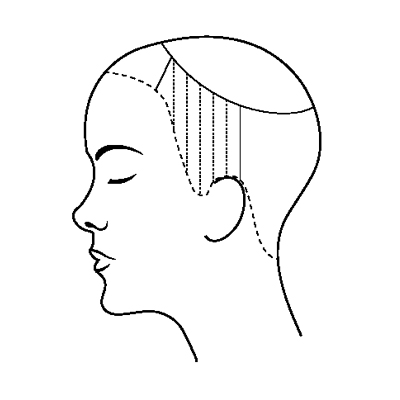
6Place foils with Highlight Formula vertically through the side panels.
-
 7
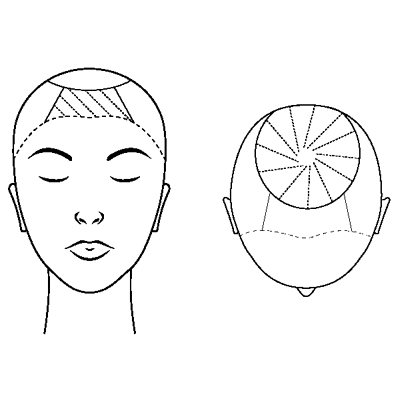
7Work through the fringe by placing foils diagonally to create more texture. Place foils into the top section in a radial pattern.
-
 8
8 -
 9
9This technique can be customized in many different ways. Here’s a placement idea, along with color formulas, you can try on your client:
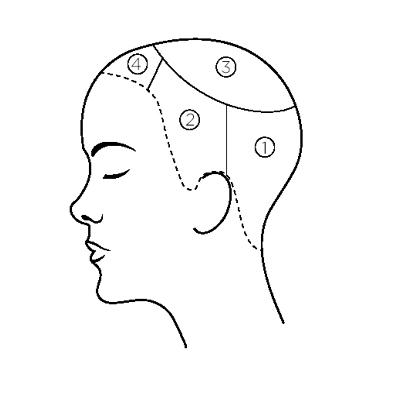
The diagram above illustrates a full-head fashion color application. Use the original sectioning pattern, but use the appropriate full-head application with the darkest color in Panel 1, a lighter color in Panel 2 and a bright formula in Panel 3. Use the brightest color in Panel 4. Depending on the focal point or depth you choose, you can swap color application in Panels 3 and 4 to accentuate the color differently.
-
 10
10This technique can be customized in many different ways. Here’s a placement idea, along with color formulas, you can try on your client:
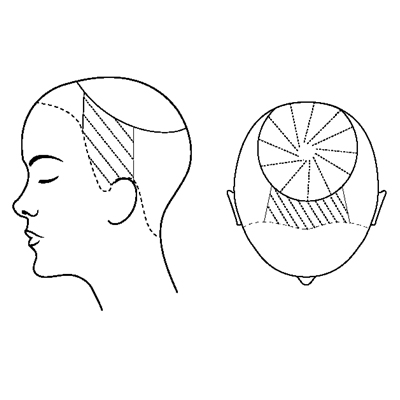
The diagram above illustrates a half-head foil placement idea. Repeat the original subsectioning, but only work foils through the sides, fringe and top. For this placement, Ian recommends a diagonal brick-lay pattern for the foils in the side panels.
YOU MIGHT LIKE THIS
-
Blonde

Summer Blonde: Highlights + Lowlights
-
Braids
NYFW How-To: Interlacing Fishtail Braids from Aveda
-
Blonde
Caramel Honey
-
Hair Color
Pink Dipped Blonde from Aveda
-
Blonde
Apricot Blonde Color and Veil Cut from Aveda
TRENDING NOW!
-
BTC Hair Trend Report
The Biggest Haircut Trends of 2024
-
Monthly Product Launch List
11 New Game-Changing Hair Launches To Add To Your Arsenal
-
Copper
What Is The "Cowboy Copper" Hair Trend? Here's What It Really Means...
-
Blonde
Conditioner Before Toner: Common Hair Myth Debunked
-
Frizz
Straighten & Smooth 2A, Fine-Medium Density Hair
-
Copper
Muted Bronze
-
BTC Hair Trend Report
WWYD: How Hairstylists Are Navigating Inflation
-
Haircuts
SHAG 101: The Dos And Don'ts

