
New Romantic Cut from Aveda

Advertisement
Advertisement
Advertisement
Advertisement
New Romantic Cut from Aveda
HOW-TO STEPS 
-
 1
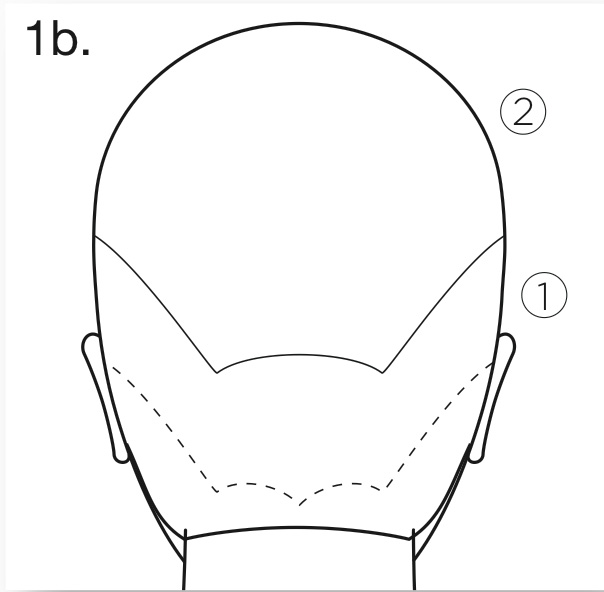
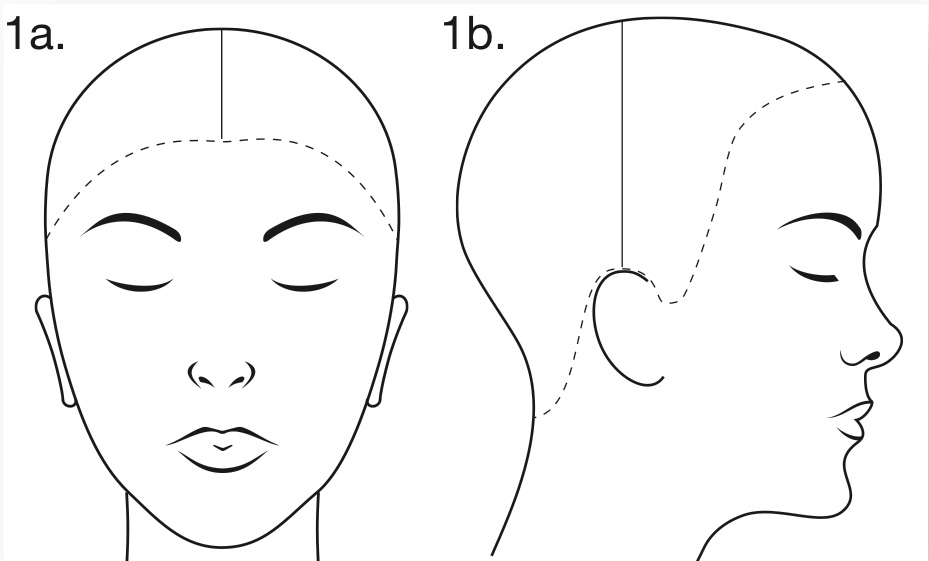
1Separate top of hair from perimeter with a curved parting from temple to behind the ear at the occipital arch, above the occipital bone. Isolate the top with clips.
-
 2
2Separate top of hair from perimeter with a curved parting from temple to behind the ear at the occipital arch, above the occipital bone. Isolate the top with clips.
-
 3
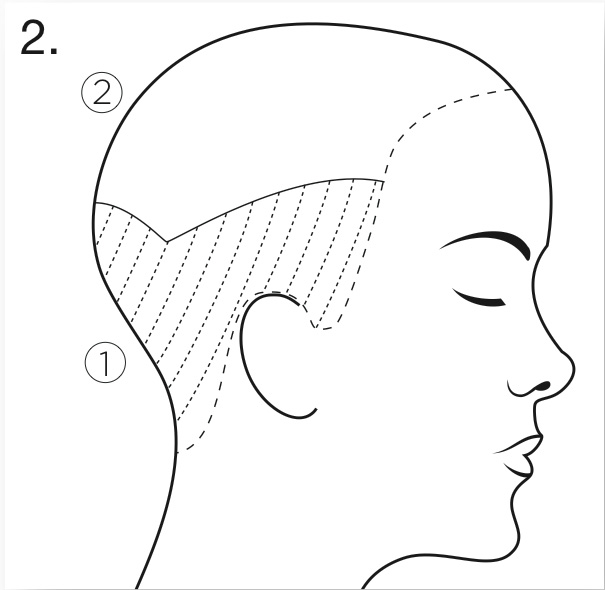
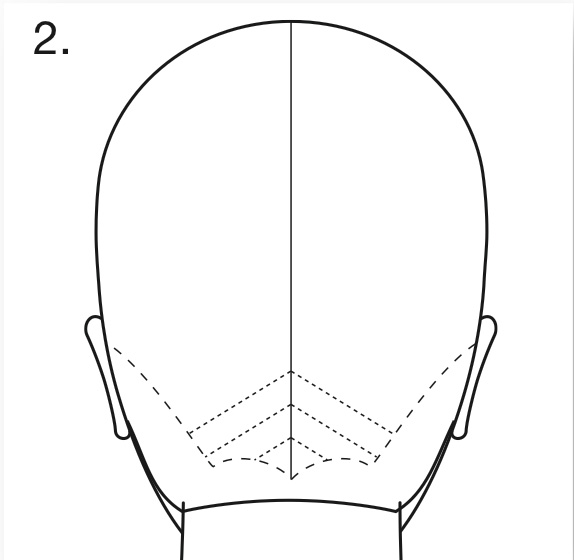
3Begin cutting in Panel 1 at right temple using diagonal graduation. Hold subsections straight out from head and cut short-to-long around the entire perimeter. Panel 1 is completely disconnected from Panel 2.
-
 4
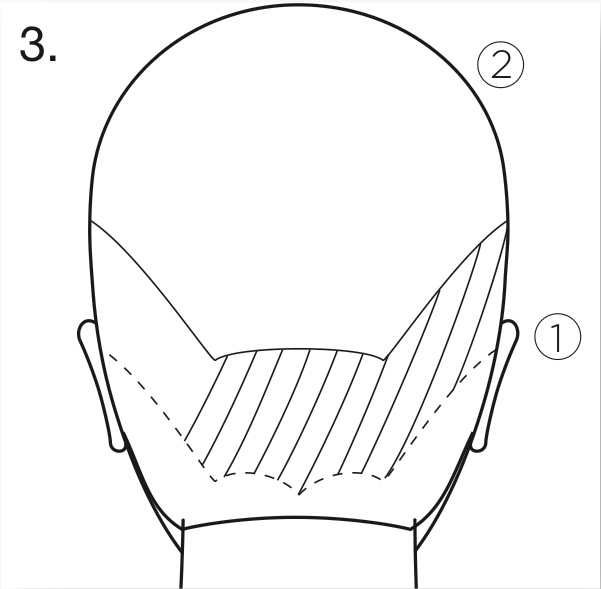
4Continue taking diagonal sections, right side to left. Cross-check and repeat on left side, crossing back over in the nape.
-
 5
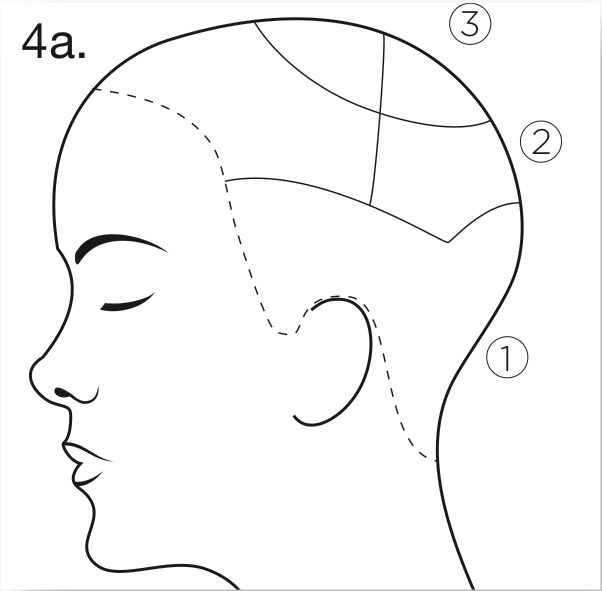
5Wrap dry Panel 2 completely. Take a circular panel from top, including the point of distribution. This is now Panel 3; clip away. Separate front from back with an ear-to-ear parting.
-
 6
6Wrap dry Panel 2 completely. Take a circular panel from top, including the point of distribution. This is now Panel 3; clip away. Separate front from back with an ear-to-ear parting.
-
 7
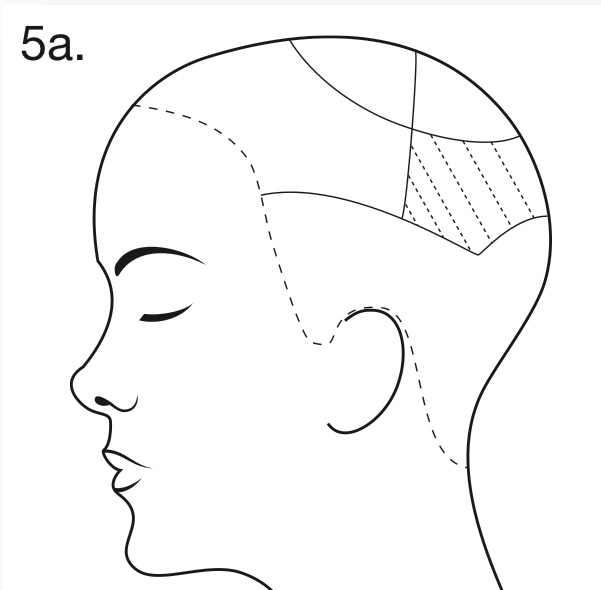
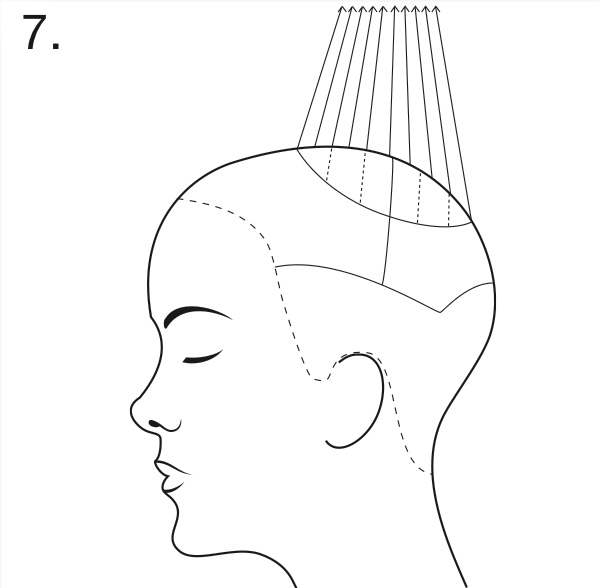
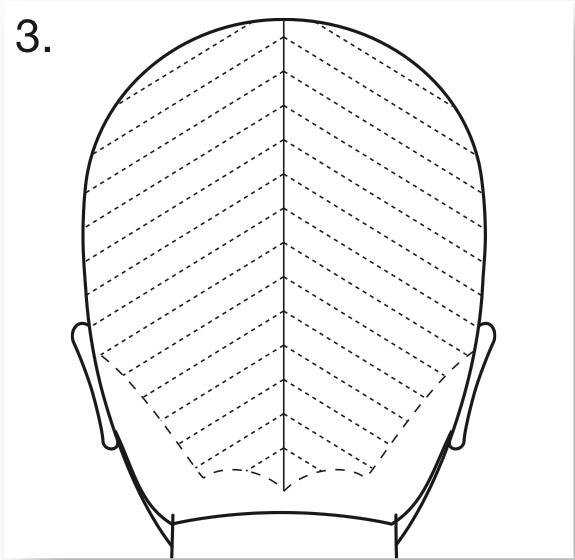
7In the rear top panel, begin disconnection with classic round graduation, cutting with scissor points to create a softer finish. The diagram illustrates the angle of partings and lines to be cut. Continue round graduation throughout the entire panel on back of both sides of head.
-
 8
8In the rear top panel, begin disconnection with classic round graduation, cutting with scissor points to create a softer finish. The diagram illustrates the angle of partings and lines to be cut. Continue round graduation throughout the entire panel on back of both sides of head.
-
 9
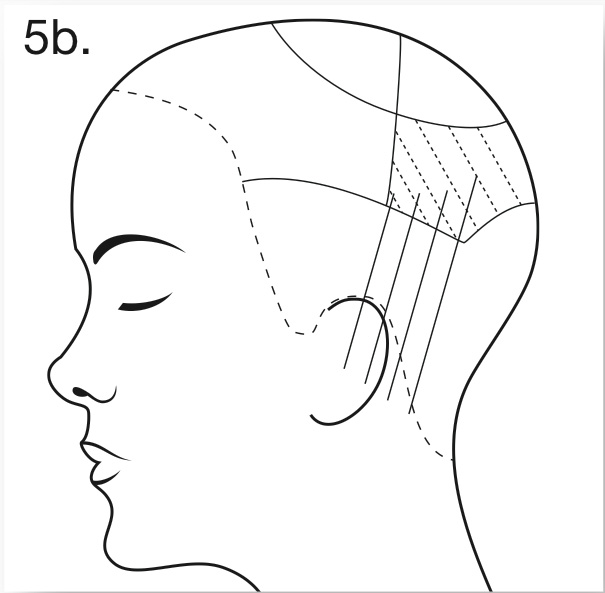
9In the rear top panel, begin disconnection with classic round graduation, cutting with scissor points to create a softer finish. The diagram illustrates the angle of partings and lines to be cut. Continue round graduation throughout the entire panel on back of both sides of head.
-
 10
10In the rear top panel, begin disconnection with classic round graduation, cutting with scissor points to create a softer finish. The diagram illustrates the angle of partings and lines to be cut. Continue round graduation throughout the entire panel on back of both sides of head.
-
 11
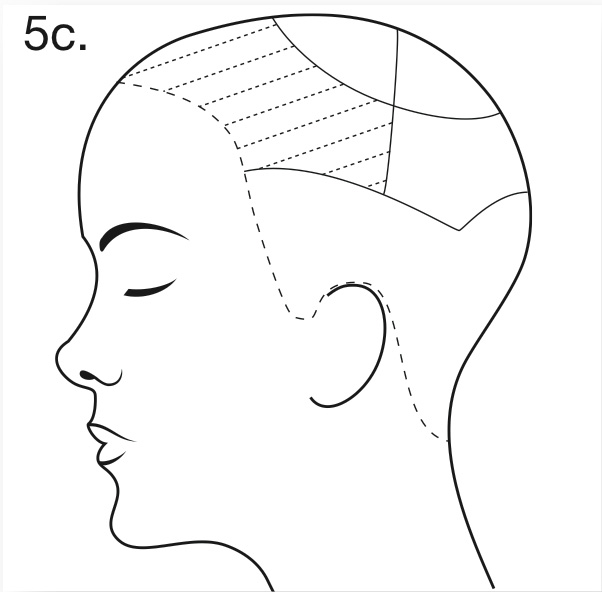
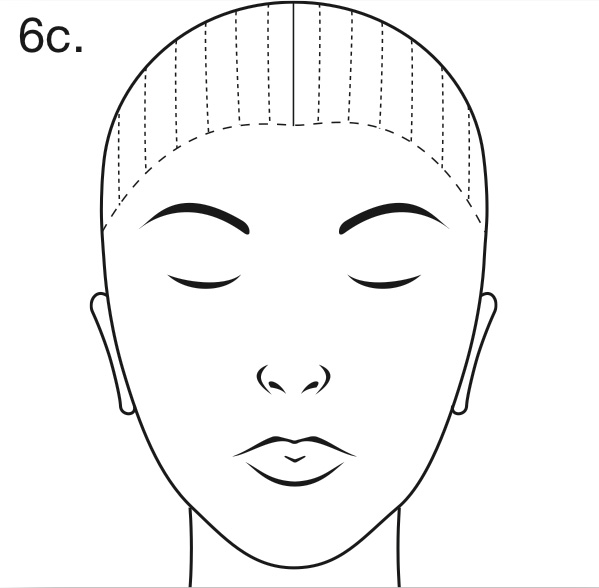
11Continue round graduation into the front top panel, cutting short-to-long, using shortest hair in rear panel as a guide. Take parallel partings as illustrated and continue to cross over top of head, bringing hair from the opposite side of the head into the guideline until you run out of hair. Continue to elevate each section, creating graduation. Repeat on opposite side of head, including over-directing hair from the opposite side across front panel to opposite side.
-
 12
12Continue round graduation into the front top panel, cutting short-to-long, using shortest hair in rear panel as a guide. Take parallel partings as illustrated and continue to cross over top of head, bringing hair from the opposite side of the head into the guideline until you run out of hair. Continue to elevate each section, creating graduation. Repeat on opposite side of head, including over-directing hair from the opposite side across front panel to opposite side.
-
 13
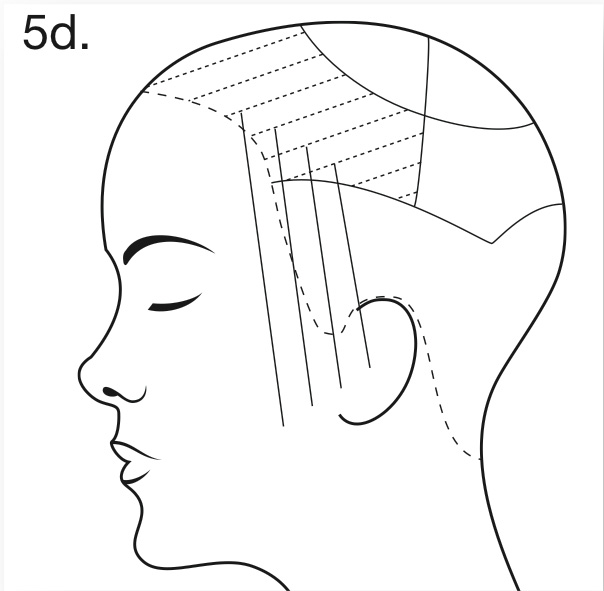
13Continue round graduation into the front top panel, cutting short-to-long, using shortest hair in rear panel as a guide. Take parallel partings as illustrated and continue to cross over top of head, bringing hair from the opposite side of the head into the guideline until you run out of hair. Continue to elevate each section, creating graduation. Repeat on opposite side of head, including over-directing hair from the opposite side across front panel to opposite side.
-
 14
14Release circle, Panel 3, from crown and allow it to drop back into place. Beginning at the center top of head, take horizontal sections, over-direct to the center point of top of head and deeply point-cut to remove the corner. Remove additional weight with a freehand technique.
-
 15
15More How-Tos
Golden Ribbons from Aveda
Texturized Halo of Hair from Aveda
Interlacing Fishtail Braids from AvedaSubscribe to behindthechair.com On Paper Magazine!
SUBSCRIBE NOW! -
 16
16Divide hair into four traditional quadrant panels from forehead to nape, then from ear to ear.
-
 17
17Using a refined virgin application, take fine slices of foil and apply Formulas A and B throughout entire cut, beginning in the nape as shown.
-
 18
18Progress upward toward the front panels until the entire head is complete. Process, shampoo, condition, towel dry and apply Formula C to all strands. Process and remove.
YOU MIGHT LIKE THIS
-
Hair
Romantic Punk from Aveda
-
Hair
Texturized Halo of Hair from Aveda
-
Hair Color
Pink Dipped Blonde from Aveda
-
Hair
Golden Ribbons from Aveda
-
Braids
NYFW How-To: Interlacing Fishtail Braids from Aveda
TRENDING NOW!
-
Curly
Long Layers: 10 Pro Tips + Common Cutting Mistakes
-
BTC Hair Trend Report
The Biggest Haircut Trends of 2024
-
Copper
What Is The "Cowboy Copper" Hair Trend? Here's What It Really Means...
-
Haircuts
SHAG 101: The Dos And Don'ts
-
Bobs
The '90s Bob: How To Cut & Style This Trending Haircut
-
BTC Hair Trend Report
Quiet Luxury Blonde: The "Old Money" Trend Explained
-
Blonde
Dear Clients, Read This Before Going Blonde!
-
Balayage
How To Turn A Brassy Lift Into A Brunette Balayage

