
WATCH: 5 Braiding Techniques, 1 Festival Style

Advertisement
Festival-worthy styles are all about embracing (and enhancing!) your client’s natural movement and texture. So, when TIGI®’s US Session Director Adriana Papaleo (@Adriana_Papaleo) went live on BTC’s Facebook, she created a look that perfectly captured her model’s individuality. Learn the five braiding techniques you need to recreate the look below!
But first, get inspired with these badass festival styles! The BTC squad pre-gamed Lollapalooza weekend with Adriana and TIGI® Bed Head at The Hard Rock Hotel in Chicago, and it was LIT. Makeovers, art installations, a killer DJ and Bed Head Swag—it all happened, so take a look inside at the weekend’s most glam pre-party (and click through the gallery above)!
Watch the full video and check out the how-to below!
How-To
1. Prep the hair with TIGI® Bed Head Superstar Queen For A Day Thickening Spray for extra grip and fullness. (1:36)
2. Apply TIGI® Bed Head Oh Bee Hive! Matte Dry Shampoo throughout the hair for gritty texture perfect for deconstructing braids. Set with a dryer on high speed and high heat.
3. You will create 5 sections in total―two on top, two on the sides and one in the center. Using her natural parting, start by taking a pintail comb and make a soft, zig-zag part. Create two sections above the parietal ridge. (4:30)
4. Isolate both sections with duckbill clips. For the top two sections, create two inside-out fishtails close to the scalp. (6:33)
5. Although you will be creating a two-strand braid, start with three strands to eliminate any separation as you move to just two strands and work through the first braid. When you get to the bottom of the braid, switch back to a three-strand for extra tension and secure with an elastic. (7:27)
6. Then, repeat on the other side. (13:14)
7. Create three bottom sections―two on the sides and one in the center. (19:07)
8. To create a five-strand braid in the center, take your fingers to separate your five pieces. Going under your first strand and over the second, continue to use this technique to work your way down the five-strand braid. When you get to the bottom of the braid, split the hair into two smaller braids and secure both ends. Then, deconstruct the hair slightly. (20:39)
9. On both side sections, create classic three-strand braids that drop down and through to the sides. On one side, once you reach halfway down, separate the hair into two fishtails and work your way through each braid. On the other side, try creating a two-strand rope braid once you’ve worked your way down past the shoulder. This gives the look variation and individuality. (28:15)
10. Deconstruct the hair section by section, starting with the fishtails and work around the head. Create the shape you want to build before pinning it into place. After, use hairpins to stabilize the hair and secure the shape while continuing to deconstruct. (39:20) Tip: Use your mirror and look at the hair from all angles as you create your shape.
11. Finish by applying TIGI® Bed Head Masterpiece Massive Shine Hairspray.
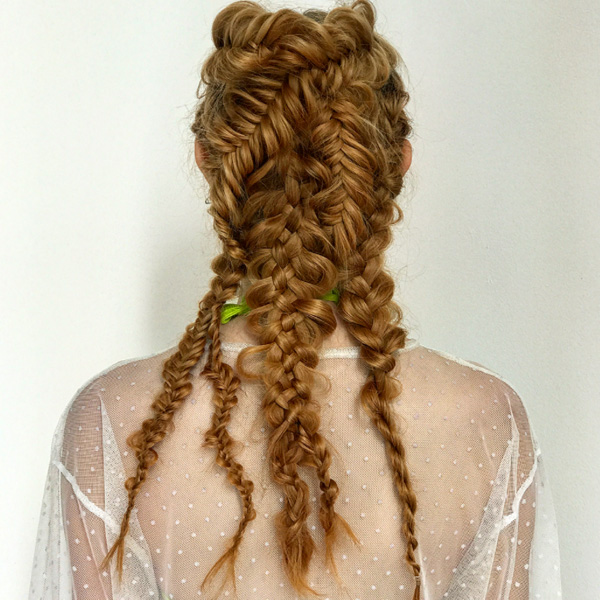 Finished Look
More from
TIGI® Professional
-
BTC Hair Trend Report
The Biggest Haircut Trends of Fall & Winter 2023
-
BTC Hair Trend Report
Your Complete Guide To Color Blocking
-
Bobs
Retouch Haircuts: 4 Ways To Touch-Up Your Client’s Cut
-
Conditioners
5 Tips For A Personalized, Lived-In Shag
-
Conditioners
Juxta-pose™ Dry Serum
-
Frizz
Contortionist™ Flexible Hairspray
-
Frizz
Wave Rider™ Versatile Styling Cream
-
Conditioners
Base Player™ Protein Spray
-
Beachwaves
3 Hair Cheats For Heatless Styling This Summer
-
Blow Dryers
The Secrets To Long-Lasting Supermodel Blowouts
-
Manufacturer
Anthony Mascolo Discusses Bed Head By TIGI’s 25th Anniversary + A New Pro Exclusive Line
-
Coronavirus
COVID-19: What The Current Closure Means For U.K. Salons
-
Haircare
Bed Head Ego Boost™
-
Styling
Salty Not Sorry™ Salt Spray
-
Haircare
Bed Head Gimme Grip™ Shampoo
-
Hair Color
Ruby Copper
-
Balayage
Want To Paint Faster Face-Framing Blends? Watch This!
-
Blonde
4 Color Placement Tips To Work Smarter, Not Harder
-
Balayage
WATCH: Avoid Splotchy Hand Painting With @wesdoeshair’s Secrets
-
Blonde
’90s Money Piece Bob
-
Haircare
Your Client’s Guide To Summer Hair Damage Repair
-
Facebook Lives
Watch: Men’s Clipper & Razor Cutting Tutorial
-
Coronavirus
Beauty Changes Lives Announces An Additional $70,000 In Grant Money Is Now Available
-
Business
3 TIGI Videos To Motivate You In Quarantine

