The Top 10 Foil Tips We Learned In 2020

10 Of The Best Foil Placement Tricks, Techniques + Pricing Ideas From 2020
2020 was the year of a lot of things—and foiling was def one of them! Most of our top articles, BTC-U courses and color formulas had one thing in common: FOILS GALORE! We get it…if you’re spending most of your days foiling away, why not learn all of the best tips and techniques to pick up the pace? Keep scrollin’ for the top 10 foil tricks we learned this year including juicy head diagrams, the dos and don’ts of teasylights, how to charge for foilayage and fast ways to keep it light and bright.
1. Blonde Roadmap For A Full-Foil Look
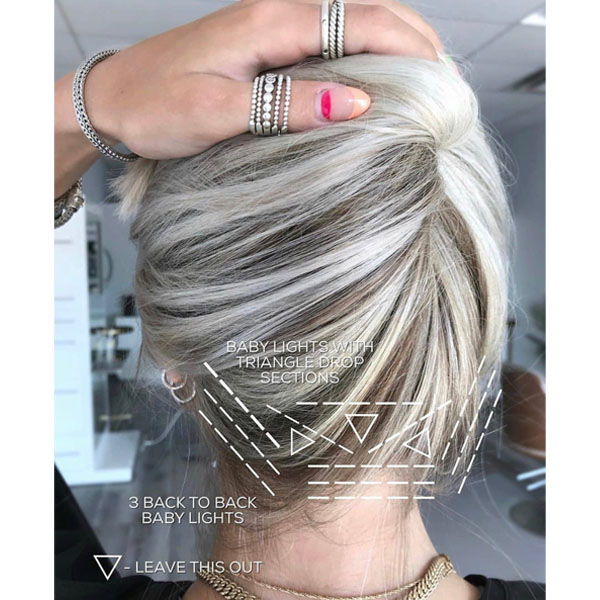
Less foils = more brightness! Try this blonding roadmap by @hairbychrissydanielle to guide your foil placement when detailing the hairline for max impact.
- Back-To-Back Babylights: Create more impact with 3 to 4 weaved babylights, depending on the client’s hair density. The only pieces left in between each foil should be the hair weaved out.
- Babylight Drop Sections: Marry the hairline into the back nape by dropping out three triangle sections (see diagram below.) This not only creates depth, but if you use this technique by itself while doing a partial, it will give the illusion of a full-foil look and a softer transition.
Pro Tip: Use the back hairline as the guide to connect the money piece. When the client sweeps their hair up into a ponytail, there won’t be any dark shadows—just brightness!
Check out @hairbychrissydanielle’s diagram below!

2. How To Charge For Foilayage
How do you price foilayage—per foil, hourly, a la carte or something else? This year, we reached out to the BTC community for pricing ideas and mistakes to avoid. Watch the video below by @sabrinathehairwitch and listen as she walks through exactly how she prices this service.
Click here to read the full foilayage pricing article: How To Charge For Foils + Balayage!
View this post on Instagram
3. Foil Placement Tip For Maximum Impact
Textured hair, unlike straight hair, does not reflect light, it actually absorbs light. So, in order to give textured clients maximum brightness, @haircolorkilla advises to place more highlights than you would for a straight-haired client.
For example, if your client is asking for their highlights to be split equally (50 percent dark and 50 percent highlight), you would have to place about 75 percent highlight so this way when their hair is curly it will actually appear to be evenly split. Kara recommends Redken Flash Lift Bonder Inside to keep highlights bright and healthy.
Swipe left for the dramatic before + after!
4. 3 Ways To Paint Teasylights
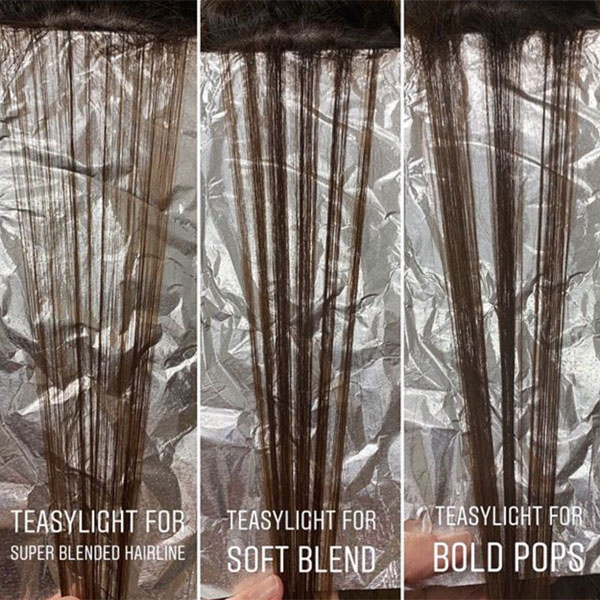
Teasylights are an ideal technique for clients who want more of a lived-in, rooty look, however, some like a soft blend while others prefer something more high-contrast. So below, we’re sharing a genius post from Schwarzkopf Professional Digital Artistic Team Member @the.blonde.chronicles that explains how to achieve a super blended hairline, a soft blend AND bold pops of brightness just by adjusting the size of your weave!
Peep this helpful “weave key” post below! 👀

5. How To Avoid A Dark Spot At The Hairline
We learned a ton of juicy foil tricks in @watchmyhairbounce’s BTC-U course “Foil Placement For Textured Hair”—click here to watch it! For example: To connect the foiled side sections to the face frame, Jeannetta works with a pivot parting using the hairline as a guide.
The Technique: Starting right in front of the ear, Jeannetta begins with a diagonal-back parting and then works her way upward including a piece of the hairline in every section. By the time she reaches the recession, the parting is almost a perfect horizontal. “This will create a full hairline connection so when she wears her hair up, her hairline is completely connected,” Jeannetta explains.
Tap the beaker below for Jeannetta’s Alfaparf Milano color formulas!

6. Tangled Teasylights—Try This Trick!
Trouble with combing out teasylights? Foil folding expert @larisadoll avoids gnarly knots by prepping the hair with Joico Defy Damage ProSeries 1: Bond Protecting Color Optimizer for a smooth, strong work surface. To comb the teases out at the bowl, she applies Joico Defy Damage ProSeries 2: Bond Strengthening Color Treatment and lets it sit for 5 minutes, then gently brushes through with a Wet Brush.
Click here to read the full express foiling article: How To Use Less Than 20 Foils For A Full-Foil Look!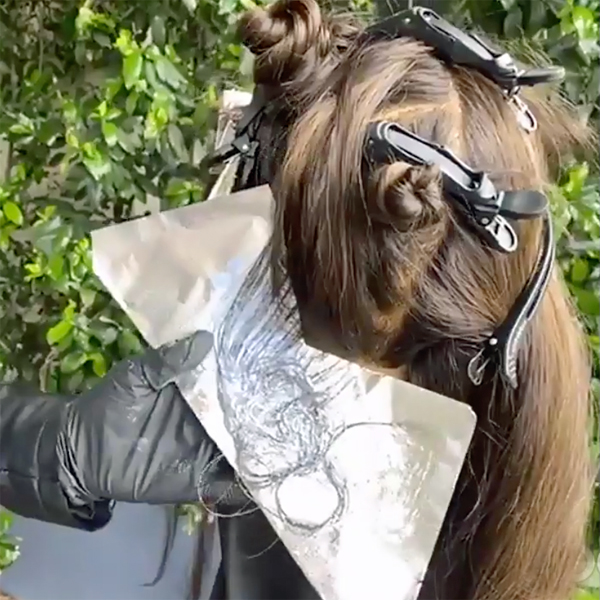
7. Weave 101: Prevent Washed-Out Babylights
Here’s how Ulta Beauty Design Team Member @betoloveshair creates more POP with intentional placement: He takes horizontal teasylight slices at the bottom, works up to diagonal medium weaves and babylights at the top to create a veil of soft dimension. This builds a blonde gradient.
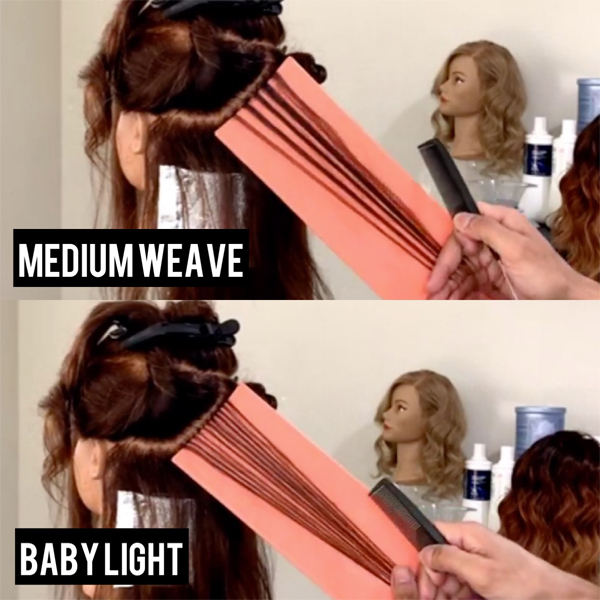
Know The Difference Between Medium Weaves + Babylights:
- Medium Weaves: Start the weave further down the section at the mids. This creates more dimension because the highlights are more visible. At natural fall, a medium weave on a diagonal will create a bolder effect.
- Babylights: Start the weave closer to the root, this allows you to be more precise. At natural fall, a babylight on a diagonal will create more natural, softer dimension.
8. Break Up Harsh Foil Lines
If a client has harsh foil lines and wants to transition into a more low-maintenance look @coloredbycaitlin leaves space between teasylights to melt. After the foil work is done, Caitlin lowlights with Wella Professionals Color Touch and brings the color only halfway down to keep the ends bright and break up lines of demarcation.

9. Icy Blonde Goals? Don’t Rinse Out The Foils Too Soon!
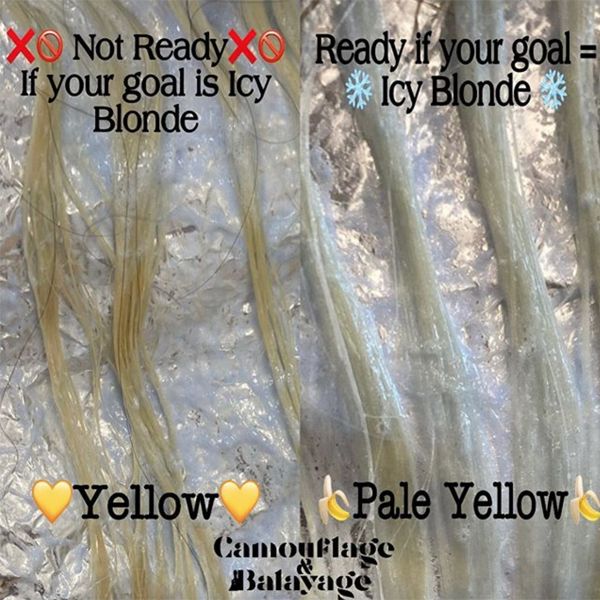
You should always rinse out pale yellow vs. yellow foils for icy blondes, suggests @camouflageandbalayage. If you want to make your life easier, simply wait until the client lifts to a pale yellow blonde before rinsing. “If you rinse at actual pale yellow—the color of the inside of a banana—you honestly don’t have to work too hard at creating a bright icy white blonde,” explains Amy. “It’s better to tone for what you got, not what you hoped for.”
Use this visual below to know if your foils are ready to rinse and tone!
Click here to read the 10 best toning tips of 2020!
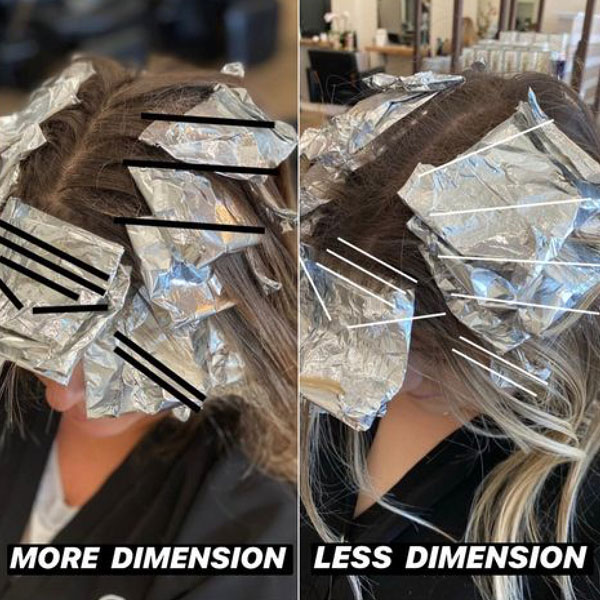
10. Use Extreme Angles For More Dimension
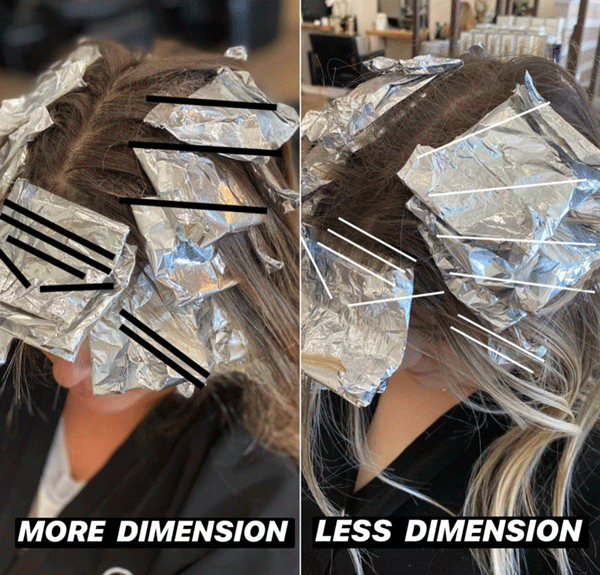
To create more piece-y ribbons of dimension, @the.blonde.chronicles applies her foils at an extreme diagonal-back angle. “The foils should be almost vertical and lay next to each other, instead of stacked,” she says. This placement allows more hair to live between the highlights, creating more contrast between the foils.
Pro Tip: To create a seamless blend and avoid the Kelly Clarkson streaks, paint the lightener to match the parting. For example, when working with diagonal back sections, apply the lightener on the hair at a diagonal in the same direction.
BONUS: 2020’s Foil Folding Debate—Forward Or Backward?
Short answer: There is no right or wrong answer! But one of our fave #btcwhatwouldyoudo questions of the year sparked a debate over the “best” way to fold foils—forward, backward or both? We settled this historical debate once and for all…well, at least tried to. 
Click here + read what stylists had to say!