
The French Blow-Dry Set: 6 Tips To Do It Perfectly

Master The Long-Lasting French Blow-Dry Set
Depending on where you apprenticed, you may not have mastered a French blow-dry—the technique that gives the ultimate luxurious, shiny and voluminous result. (Plus, it’s crazy long-lasting—we’re talking seven days—if you prep right and finish with the correct products!) Liz Haven O’Neill, aka @lizhaven, swung by The BTC House in West Hollywood to demo the technique, and we pulled her top tips for you! “This is the hook, line and sinker with your guests—they are going to pre-book if you send them off with a set like this,” Liz said. Say no more, fam! We’re trying this ASAP!
Learn Liz’s French Blow-Dry Technique: Click Here To Purchase!
Products Used
1. Start the blowout with wet hair—do NOT rough dry. Why? Starting with a damp canvas allows you to mold the hair’s hydrogen bonds and achieve a better result. If any areas dry before you get to them, re-dampen with a spray bottle.
2. Prep with a cocktail of mousse and serum on damp hair. The mousse helps mold the hydrogen bonds into shape, and the serum helps smooth the cuticle. Liz’s go-to blowout cocktail is SEVEN® haircare BORATO mousse foam and GAZAR diamond serum.
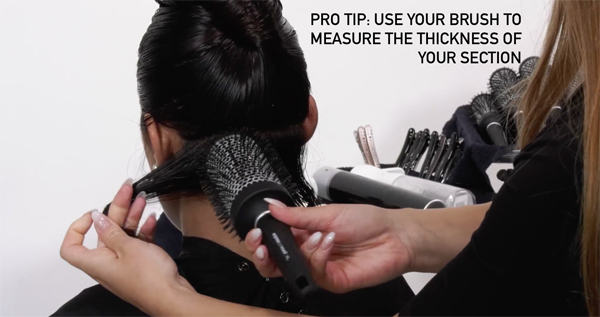
3. Use the metal-core round brushes you select to determine the size and thickness of the sections. The section should never be wider than the length of the brush’s body and thicker than the diameter of the brush.
4. Hold each section out at a 90-degree angle and focus heat at the root—this builds major volume! Then slowly work to the mids and the ends.
5. Use small strokes or “flicks” with the concentrator just above the hair to smooth flyaways and baby hairs (watch the gif above!).
6. When a section is completely dry and smooth from roots to ends, spray with SEVEN haircare CUBICA working spray. Elevate the section to a high 45-degree angle, mold the hair by wrapping it around the brush to the base, use the cool shot on the blow-dryer (or the back of the blow-dryer) to set and move on to the next section.
Check out this finished look using the same technique on another client!
Learn the entire step-by-step technique from Liz! Click here to purchase the how-to video!
More from
Liz Haven O'Neill
-
Glossing/ Toning
9 Toning Tips for Every Client
-
Curly
Long Layers: 10 Pro Tips + Common Cutting Mistakes
-
Color Melt
HOW TO AVOID A BLOTCHY TONER
-
Balayage
4 Post-Quarantine Haircolor Solutions You Can Charge Money For
-
Balayage
Hand Painting: How It Works & Why You Should Be Doing It
-
Business
Tips & Tactics For Staying Busy During Slower Times
-
Blowouts
4 Blow Drying Tips To Start Using ASAP
-
BTC "On Tour"
BTC Hosts First Ever International Show: “On Tour” London
-
BTC "On Tour"
“On Tour” London Cocktail Party
-
BTC ON TOUR
BTC “On Tour” Is Going To London, England—Here’s The Artist Lineup!
-
#thebtcshow 2019
#THEBTCSHOW 2019: Day 1
-
#thebtcshow 2019
Schwarzkopf Professional at #THEBTCSHOW 2019
-
BTC ON TOUR
“On Tour” Dallas Cocktail Party
-
BTC Events
BTC “On Tour” Dallas Show—Here’s Everything That Happened!
-
Business
Celebrate Mother’s Day With Advice From These Inspiring Hairdresser Moms
-
Balayage
Reverse Balayage: Everything You Need To Know About This Technique
-
BTC Events
BTC “ON TOUR” CHICAGO
-
BTC Events
BTC’s “On Tour” Show Is Coming To Chicago—Here’s The Artist Lineup!
-
Read These 4 Tips Before Your Next Teasy Lights Appointment
-
Balayage
11 Chocolate & Caramel Formulas That’ll Satisfy Your Sweet Tooth 🍫
-
Blowouts
9 Blowout Tips You Need In The New Year
-
Beachwaves
7 Articles That’ll Take Your Styling Game To The Next Level In 2019
-
Blonde
5 Tips For Mastering @lizhaven’s Strandlights Technique
-
Brunette
Seamless Chocolate Blend

