
Silk Press Cheat Sheet: 4 Tips For Beginners

Ask A BTC Expert: Silk Press Tips From @johnwgeorge
Looking to add the silk press to your service menu, but don’t know where to start? We featured John George (@johnwgeorge) on “Ask A BTC Expert” to create the ultimate silk press guide for beginners! Learn what tools and advice you’ll need to get started on your journey to becoming a silk press pro.
Keep scrollin’ to learn beginner’s tips, watch the IGTV below and click here to learn John George’s FULL technique!

1. What tools do you recommend for a beginner?
The tools you’ll need in your kit depend on the type of texture you are working with, says John George. That’s why it’s important to educate yourself and experiment with tools until you figure out what’s right for you and your clientele.
So, what must-haves are in John George’s starter kit? Here are some tools you’ll need to get the job done, plus a few pro tips to make sure clients are comfortable throughout the entire service!
#1: Blow-dryer and brush
John George’s go-to: Denman Brush for easier control, detangling and smoothing of the hair.
#2: Wide-tooth detangling comb
This will help with even product distribution from scalp to ends while applying product at the shampoo bowl. The comb needs to be able to work through the density of the natural hair.
Pro Tip: Don’t make this mistake! Clients should always feel comfortable in your chair, and pulling their hair with a comb or brush will do the opposite. Avoid using a comb that’s not wide enough or can’t work through the client’s curl pattern and density to prevent discomfort.
#3: Heat-resistant comb
John George’s go-to: Cricket Professional Carbon Comb.
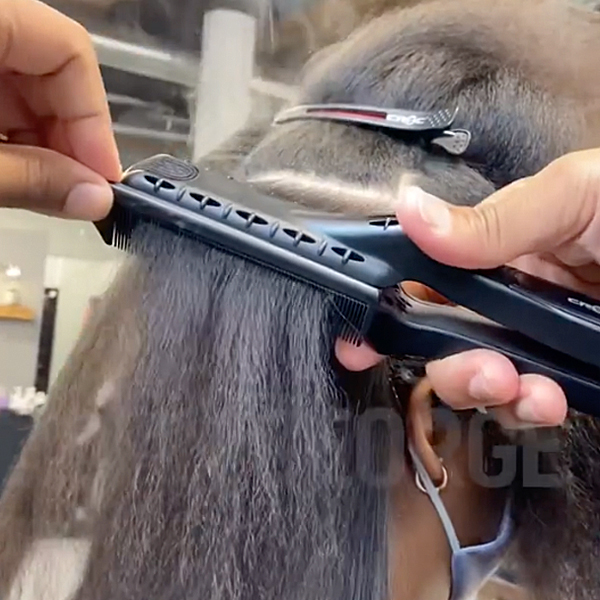
#4: Quality flat-iron
John George’s go-tos: Infrared New Classic, Infrared Premium or Infrared Masters by CROC Professional. Remember, choose tools that won’t run the risk of burning out the hair.
Watch The Silk Press In Action Below!
View this post on Instagram
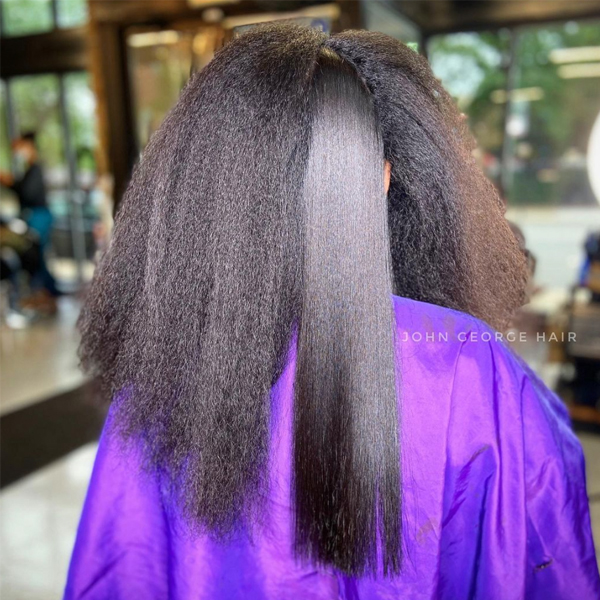
2. How do you make a silk press last longer & stay silky?
There are a few key factors that will determine how long a silk press will last and pro tips for dealing with potential issues.
- Starting Position: Analyze The Hair’s Condition
- Dehydrated hair or split ends? The client may need a haircut and several treatments before starting the silk press process.
- Analyze if the client has previous chemical or heat damage.
- How Climate & Humidity Impacts Longevity
- How warm is the environment outside?
- What’s the dew point, aka the amount of moisture in the air?
Here’s why: If the hair is dehydrated and the environment is humid, the hair will try to grab onto any moisture it can. This will cause swelling in the hair and the silk press won’t last as long.
Solution: Try A Wrap Or Ballet Bun
Silk Press Clients With Straight Hair
- After the hair is straightened, wrap the hair.
- Take a paddle brush, start at the crown and work the hair like a beehive hairdo.
- Have the client keep their hair wrapped in a silk or satin scarf when they are at home.
- Avoid moisture at all costs! The client should wrap the hair until they’re ready to show it.
Silk Press Clients Styled With Curls
- For silk press clients who want waves/curls in their finished look, don’t suggest a wrap that will flatten out the curls. Instead, offer a ballet bun that will have the same effect.
- Pull the hair into a bun and wrap the curls around to secure the smooth sides and the curls into place.
- When the bun is taken down, the hair will have a lot of body with their silky curls still intact.
Slide Through: Straight or Curly
#3: How do you prevent disrupting the curl pattern or causing damage?
The No.1 factor that will disrupt the curl pattern is heat damage, aka when the hair’s elasticity has been compromised and burnt out. Elasticity is what allows the hair to stretch from its curly state when wet, straighten and snap back. When too much heat is used, the elasticity will weaken.
Solution: Identify Hair Type + Manage Heat Usage
Manage heat usage and understand every client’s curl pattern and hair type. For example: Even if the curl pattern is tight, the hair can still be fine—so always check the width of the hair strand to identify if it’s fine, medium or coarse. This will determine the heat usage for each client. Remember: Fine hair requires less heat usage than coarse hair.
BTC “On Tour” Nashville is SOLD OUT! But you can watch it LIVE:
- Learn fall’s BIGGEST haircut trends: Bobs, shags, layers & more!
- 6 Classes. 20 of the Industry’s BEST Artists.
- Register here!
#4: What is your best advice for smoothing out the roots?
Throughout the entire process, from the blowout to the silk press, use the proper tools to get the roots ultra-smooth.
- Use a blow-dryer and brush to get the roots as straight as possible, working from wet to dry.
- Then, work with a 3/8-inch flat iron to smooth out the root area. John George prefers using a Kizure Marcel Stove Iron that gets directly at the roots with a heat-resistant Cricket Carbon Comb.
Watch The Technique Below!
View this post on Instagram
Click here + learn the silk press process from start to finish on BTC-U!

Ask A BTC Expert: Watch The Full IGTV Below
View this post on Instagram
More from
John George III
-
Gray
Toning Relaxed Grays: How To Avoid The Yellow/Green Fade
-
BTC Hair Trend Report
Invisible Layers: What This Haircut Trend Really Means
-
BTC Hair Trend Report
2023’s Biggest Haircut Trends
-
Haircare
Do This To Elevate Your Client’s Shampoo Experience!
-
Blonde
10 Ways To Service Your Textured Clients
-
Balayage
5 Things You Didn’t Learn In Beauty School
-
5 Things You SHOULD Know How To Do
-
BTC University
3 Silk Press Tips To Avoid Unwanted Dents
-
Blowouts
6 Silk Press Tips For Achieving A Smooth Finish
-
Blowouts
Blowout Guide: Pro Tips For Rollers, Round Brushes + Pin Curl Sets
-
Hair Color
Relaxer & Color Services On The Same Day?
-
Blowouts
The Silk Press: 7 Tips To Perfect The Process

