
Shear Etching: Everything You Need to Know

VIDEO 
HOW-TO STEPS
-
1
Rest the still blade on the client’s head.
-
 2
2Begin air-cutting, using small opening and closing movements before actually cutting any hair so that you already have the right movement down as you start your line.
-
3
Try to cut from the beginning point to the end point without stopping.
-
 4
4If the extension of your arm/wrist limits your reach while cutting the line, stop and begin again from your end point, meeting the other section of your line in the middle.
-
5
Once you’ve created your line, go back in with the trimmers to tighten it up. Some barbers will even use a straight razor for this.
-
6
Stability is key! You can use your non-cutting hand to stabilize your shears at the pivot area, hold the client’s head still or even gently maintain their chin position to avoid any inadvertent rotation.
-
7
Pick a starting point and ending point and visualize the line while you cut.
-
8
When you’re just beginning, start with shorter, straighter lines. As you begin to feel more comfortable, longer or curved lines become less challenging.
-
9
Use smaller, more detail-oriented shears (5.5” or shorter). The smaller the blade, the more you are able to open and close the shears in a small area, giving you much more control.
-
10
“People often ask how sharp the shears need to be,” says Doug. “As long as they’re sharp enough for a cut—without pushing hair—they’re sharp enough for etching.”
-
11
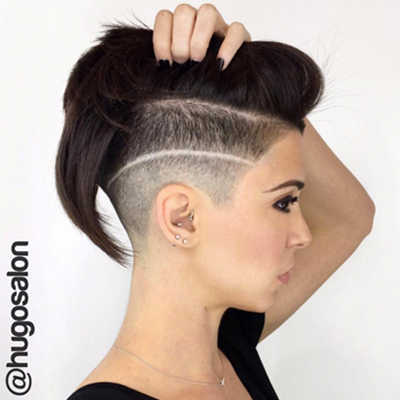
Typically, designs look cleaner when the undercut is faded, so Doug usually teaches fading before shear etching.
-
12
Take down the length of the undercut first, then cut the lines. Save the fade for last. This allows you to customize your fade to accent the design. “For example, in the look below, once the line across her right side was set, I was then able to create two separate fades (one above the line and another below it),” says Doug.
-
13
Only use the point of your shears. This will help you avoid opening and closing your shears too widely, and smaller movements mean smaller errors.
-
14
Practice on a mannequin. “None of us love that idea, but it’s important to get comfortable and create muscle memory before jumping in with a client,” notes Doug.
-
15
Be honest with your client. “I was once in the middle of a design when I realized it just wasn’t going to turn out like I’d hoped,” shares Doug. “If you find yourself in that situation, speak up. In that instance, I switched to a geometric design, and [my client] was incredibly grateful I didn’t continue with something I knew I wasn’t going to do well.”
More from
Doug Theoharis
-
#thebtcshow 2019
#THEBTCSHOW 2019: DAY 3
-
#thebtcshow 2019
PULP RIOT AT #THEBTCSHOW 2019
-
Braids
Your Complete Guide To Braids & Beauty For Summer Music Festivals
-
#THEBTCSHOW 2018
Pulp Riot: Bubble Technique, Gray Coverage Highlights & Peekaboo Designs
-
#thebtcshow Austin 2017
The Behind The Chair Show 2017: Day 2
-
#thebtcshow Austin 2017
Pulp Riot at #thebtcshow
-
Barbering
11 Tips For Hair Tattoos That Slay
YOU MIGHT LIKE THIS
-
Blonde


Textured Pixie Undercut
-
Blonde
Ultra-Blonde Undercut from PHYTO
-
Haircuts
Edgy Undercut
-
Tools
Doug Martucci’s Marilyn Brush Tricks, Tips and Techniques
-
Haircuts
The Layered Undercut
TRENDING NOW!
-
BTC Hair Trend Report
The Biggest Haircut Trends of 2024
-
Blowouts
Bombshell Blowouts: 4 Ways To Create Lift With Longevity
-
Copper
What Is The "Cowboy Copper" Hair Trend? Here's What It Really Means...
-
Curly
Long Layers: 10 Pro Tips + Common Cutting Mistakes
-
Ask A BTC Expert
5 Foil Tips & Tricks From @the.blonde.chronicles
-
Hair Extensions
Clients With Hair Loss? Read This To Get Their Pre-Thinning Density Back
-
Frizz
Straighten & Smooth 2A, Fine-Medium Density Hair
-
Haircuts
SHAG 101: The Dos And Don'ts

