
Pop, Lock and Drop It: The Tape-In Extension Technique


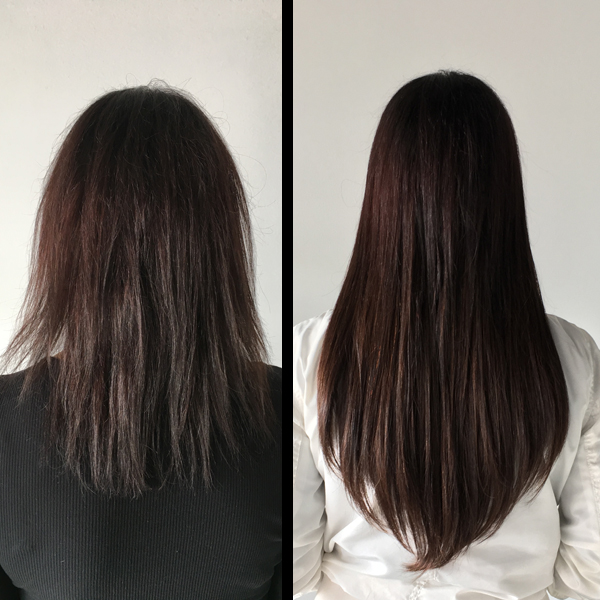
Think hair extensions are too complicated to work into your everyday routine? Think again! We visited the William Robert Salon in Cherry Hill, N.J., where hairtalk® educator Alicia Iannone (@liciebaby) showed us a complete tape-in extension transformation on Facebook Live to prove just how easy the service can be! Here are a few things we learned:
- Tape-ins are a FAST service—you can complete an entire head (meaning you’re adding length, fullness and color) in under two hours!
- Tape-ins are a luxury service and a big moneymaker for stylists—and a lot of times, extension clients are clients for life.
With more than 800 comments and questions from all of you, the Facebook Live was full of amazing tips, tricks and techniques. Here are two we had to share.
How much do hair extensions cost? And how much should you charge? Click here!
Pop, Lock and Drop It Technique
To add the tape-in extension perfectly, Alicia uses her “karate chop, pop, lock and drop it” method. Here’s how it’s done (if you’re right-handed!):
- Grab the section you’re going to sandwich in with the tape-ins and hold it taut with your right hand. The bottom tape-in extension is also in your right hand at this point.
- Then “karate chop” with your left hand where the scalp and the section meet. Then place the hair between your left middle and pointer finger, flipping or “popping” the hair up.
- Then, using your right hand, place or “lock” the tape-in directly underneath the section of hair that is popped up. Then drop the hair down, smoothing it over the tape-in.
- Tune at 23:00 to see the technique in action!
Remember: When applying the tape-ins, stand on the side of the head as opposed to standing directly behind the client. This will help your arm positioning and help keep the extension straight when applying to the head. Watch Alicia explain at 23:00!
Use Texturizing Shears To Create Dimension Around The Face
- Adding more than one color when applying extensions can create a more natural, more blended outcome.
- To do this, use one color on the bottom of the tape-in sandwich and one color on the top.
- Alicia used this technique throughout the entire head, applying the hairtalk® Naturals number 5 on bottom and mixing it with the number 4 on top.
- To create more color around the face, Alicia suggests taking texturizing shears and thinning the top tape-in. This allows the bottom color to peek through a little bit more. Think of this as a custom, face-framing highlight or lowlight that should only be used on a couple tape-in strands.
- Don’t use this technique throughout the entire head because then the extensions won’t match the client’s actual hair density when the application is complete.
Remember: hairtalk® extensions come in all different sizes—original/original plus, petite/petite plus, mini strands/mini strands plus—which means when working around the face, or in other finer/thinner sections, you can use the smaller tape-ins to create a better blend and a more seamless outcome!
Want more? Watch the full video below and find out things like how to remove the tape-ins (8:00) and how to avoid a stringy-looking end result (37:00)!
Products Used
More from
Hairtalk
-
Facebook Lives
Create A Bronde Balayage Without The Bleach: Here’s How!
-
Extension Application
TRIPLE YOUR PROFIT PER HOUR: HAIRDRESSERS, LISTEN UP!
-
Manufacturer
Beauty Industry Group Announces Leadership Changes
-
Hair Extensions
How To Book And Price Multi-Method Extensions Services
-
Hair Extensions
hairtalk® Launches Keratin Extensions
-
Business
How To Choose The Best Type Of Extensions For Every Client
-
Hair Extensions
Pro Tape-In Extensions
-
Business
Get Certified in 3 Extension Installation Methods With This Online Course
-
Facebook Lives
Timesaving Technique: Instant Beaded Row™ Extension Installation
-
Hair Extensions
Instant Beaded Row™
-
Bobs
4 Tips To Build A Full Bob With Extensions
-
BTC Events
BTC “On Tour” New York City 2020
-
Hair
Transformation: Blunt Blonde Bob With Extensions
-
WATCH: Double Hand Tied Weft Extension Application Technique
-
Hair Extensions
Double Hand Tied Weft
-
BTC Events
BTC “On Tour” Nashville—Here’s How We Closed Out Our 2019 Tour
-
BTC Events
BTC “On Tour” Nashville
-
BTC University
4 Tips To Give Clients Better, Blonder Extensions
-
Hair Extensions
Give Your Clients This Guide For At-Home Extension Care
-
Brushes/Combs
Extension Brush
-
Hair Extensions
6 Mistakes That Can Ruin A Tape-In Extension Application
-
Hair Extensions
How To Properly Prep The Hair For Extensions
-
Bobs/Lobs
Watch: Lob Styling Using Extensions
-
Best of 2018
The Extension Education You Need Before 2018 Ends

