
How-To: Dutch Braid Updo
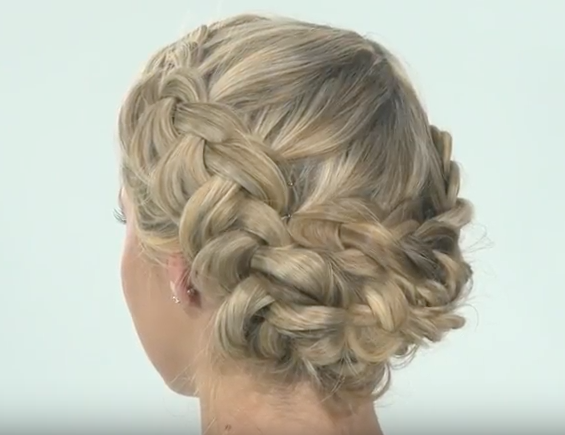

She’s obsessed with the big beautiful braids she’s been spotting on Instagram, and she’s dying to rock one too. But you know her fine hair will make her expectations fall flat. When you combine DreamCatchers extensions with this super easy (but very chic) Dutch braid updo, you’ll really amp the braid up by adding length and density. See how it’s done below!
DreamCatchers are quick to initially install, plus they must be maintained every four to six weeks, which = MONEY! And DreamCatchers literally sends you clients!
The company advertises in popular consumer mags (think People and US Weekly), then automatically directs customers right to you! In order to get your phone ringing off the hook with new clients, you have to be certified—but DreamCatchers just made that easier with its online certification. Basically now you can use your iPhone to get certified. Once you’ve got your certification and you’re all booked up, give this Dutch braid updo a try!
How-To
1. Starting at the nape, loosely curl the hair. This will help your braid hold better.
2. Create a side part and clip the smaller section away. Starting at the hairline, begin a Dutch braid down the head and continue braiding to the very end. Secure the braid with an elastic, but wrap it a little loose, then hold the end of the braid and pancake it for volume.
3. Repeat step 2 on the other section of hair.
4. Return to the first braid. Hold a piece of hair in the braid and push up with your hand, ruching the braid so it bundles together at the base of the head. Pin in place, then repeat on the other braid.
Watch the full how-to!
More from
DreamCatchers
-
Color Melt
4 Tips For Coloring Hair Extensions
-
Extension Removal
Hybrid Hair Extensions: Installation Tips
-
Braids
6 Game Of Thrones-Inspired Braids
-
Brushes/Combs
19 Products We Can’t Stop Obsessing Over
-
Hair Color
How-To: Coloring Extensions
-
Hair
How-To: Party-Ready Faux Hawk
-
News
BREAKING NEWS: Finalists Announced for the 2016 Stylist Choice Awards!
-
Business
Extension Certification Just Got Easier
-
Hair Extensions
Temporary Bangs
-
News
BREAKING NEWS: Finalists Announced for the 2015 Stylist Choice Awards!
-
Hair
4 Tips and Tricks For Creating Upstyles with Extensions
-
Hair
Long, Luscious Hair

