
5 Styles for the Non-Traditional Bride

The fluffy, white meringue gown? Nah—she’s wearing a scarlet pantsuit. The traditional floor-grazing veil? Not gonna happen. Diamonds? Nope—she’ll be sporting her Samoan fertility amulet.
Not every bride wants tried and true, borrowed and blue on her wedding day—some gals eschew tradition for something quirkier. And that includes the hair. BTC Bridal Expert Stephanie Brinkerhoff has it covered—a full portfolio of anything-goes bridal styles. From bold to Boho, to edgy takes on old standards, here are some of her picks for your non-traditional wives-to-be!
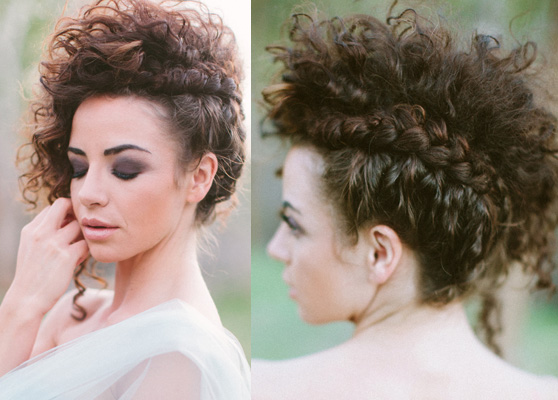
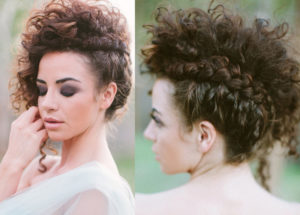
1. FAUXHAWK UPDO
Can a hairstyle be edgy AND pretty? Here you go—a beautifully entwined Fauxhawk that, says Stephanie, is also flattering and photogenic.
how-to:
1. Loosely curl and backcomb all the hair to create an optimal texture with volume.
2. Section out two inches around the entire hairline, and clip aside.
3. Gather the remaining hair into four ponytails, beginning on top of the head and continuing downward to the center back.
4. Subdivide each ponytail, and loop and pin each curl to form the segments of the Fauxhawk. Backcomb again if more volume is needed.
5. Release the hairline section and loosely sweep the hair up into the Fauxhawk, securing with pins and allowing wispy sections to fall free and frame the face.
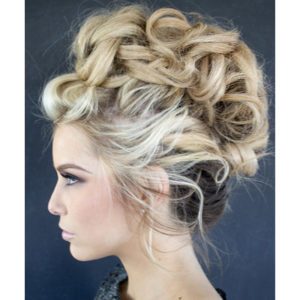
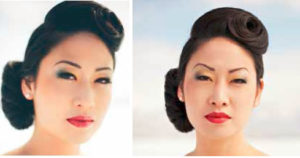
2. RETRO BARREL ROLL
Stephanie characterizes this mix as “pin-up meets Gwen Stefani.”
how-to:
1. Create a U-shape parting that begins and ends on each corner of the forehead and extends back from the hairline about three inches. Clip aside.
2. Gather the rest of the hair in a low, side ponytail.
3. Flip the ponytail inside out, and create a vertical chignon, looping from back to front and hiding the elastic. Secure with pins.
4. Release the top, and loosely curl the entire section with a 1½-inch curling iron.
5. Loop the curl tightly, and pin it into place, pushing it up slightly to produce more volume.
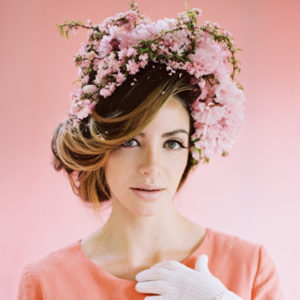
3. SUPPORT SYSTEM
Out-of-the-box brides love exotic millenary, especially when it’s fashioned from unconventional materials like feathers, flowers or ferns. Create a solid support structure for her headwear choices—one that can also stand alone when it’s time to doff the bonnet and dance!
how-to:
1. Loosely curl all hair in subsections with a 1½-inch curling iron.
2. Part the hair on the heavy side, from the back of the ear to the hairline, and clip aside.
3. Gather the rest of the hair across the back of the head to the heavy side.
4. Gently gather the hair upward, creating a loop, and pin it just behind the ear.
5. Release the hairline section and twist it loosely, directing it away from the face. Drape it over the ear and pin it into the updo.
4. THE PILLOW HEAD BRAID
This one says, “I stayed out all night, woke up at noon and decided to get married.” Perfect for the free-spirited bride!
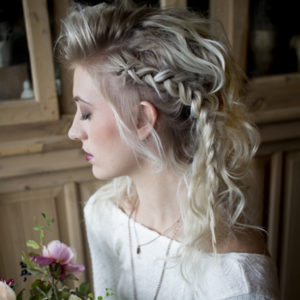
how-to:
1. Create a deep, side part.
2. Subdivide the hair into small sections, then twist each section loosely and wrap it around a 1-inch curling iron to create a disheveled wave texture. Continue until the entire head is curled.
3. When curls are complete, use your fingers and spray wax to tousle and volumize the hair.
4. Beginning at the hairline on the shallow side, create a horizontal, inverted French braid that extends from front to back.
5. When the braid reaches the ear, switch to a three-strand braid that follows the curve of the neckline.
6. Backcomb the heavy side for additional volume.
5. ROCK ‘N’ ROLL INVERTED BRAID
Asymmetric texture divided by a ropy braid evokes avant-garde romance.
how-to:
1. If the client’s hair isn’t naturally curly, use a curling iron to create the desired texture.
2. Gather all of the hair up and over the top of the head, directing it from the left ear to the right.
3. Beginning at the hairline at the bottom right of the head, create an inverted French braid. Continue braiding up the head, toward the face.
4. As you braid, feed in hair only on the side closest to the ear to create the one-sided, inverted French braid.
5. Continue braiding to the forehead.
6. At the forehead, secure the braid, incorporating the ends into the curls on the right side.
7. Gently loosen the hair with your fingers, and mist the curls with volumizing spray.
More from
Stephanie Brinkerhoff
-
Bridal
4 Bridal Styling Mistakes & How To Solve Them
-
BTC University
Bridal Client Struggles? How To Book, Schedule and Handle Brides
-
Beachwaves
Boho Bridal Crown Braid
-
Bridal
8 Bridal Styles You Can Learn Right Now
-
Bridal
Bridal Stylists: 5 Tips For Working During A Pandemic
-
Beachwaves
7 Articles That’ll Take Your Styling Game To The Next Level In 2019
-
Bridal
5 Photography Tips That’ll Elevate Your Bridal Styles
-
Bridal
7 Tips For Perfectly Imperfect Bridal Styles
-
Bridal
Bridal Stylists: This Chart Will Make Consultations So Much Easier
-
Braids
@hairandmakeupbysteph’s Crown Braid
-
#thebtcshow Austin 2017
Want To Keep Your Blondes Blonde and Your Upstyles Solid? Read This…
-
#thebtcshow Austin 2017
The Behind The Chair Show 2017: Day 3
-
#thebtcshow Austin 2017
TRUMATCH by Daniel Alain at #thebtcshow
-
#thebtcshow Austin 2017
The Behind The Chair Show 2017: Day 2
-
#thebtcshow Austin 2017
Kenra Professional at #thebtcshow
-
Bridal
3 Bridal Style Issues: Solved
-
Bridal
5 Bridal Styling Tricks You Should Be Using
-
Bridal
Every Upstyle Should Start With This…
-
Braids
Beachy, Five-Strand Braid
-
News
The BTC #Squad Spills It All: Color Melts, Balayage & Going Platinum
-
BTC COLOR, Cut & Style Show
COLOR, Cut & Style 2016
-
Hair Extensions
BTC Exclusive! TRUMATCH Hair Extensions
-
BTC "On Tour"
BTC “On Tour” LA 2017
-
Bridal
How-To: 4 Upstyles For Wedding Season

