
4 Ways To Photograph Hair Using A Ring Light

4 Ways To Make Any Hair Appointment A Photo Shoot
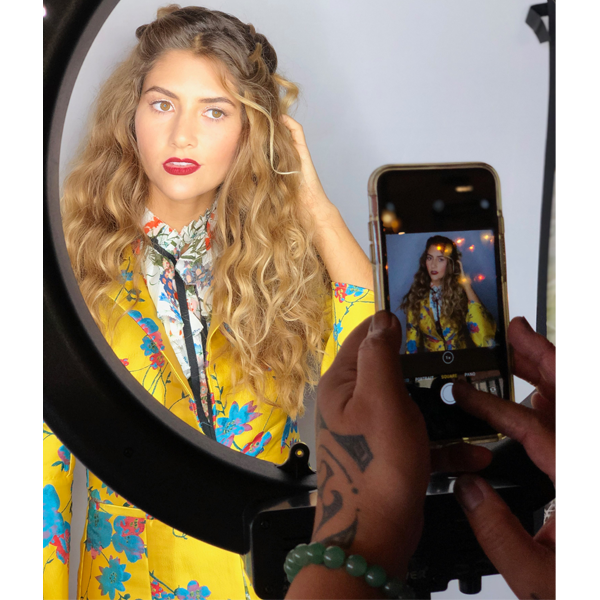
Are you comfortable shooting your work in the salon, on your phone and using different light sources? Here’s what you need to know: If you can’t easily access natural light in your salon environment, a ring light can be a great photography tool IF you know how to use it properly. That’s why we’re sharing lighting, camera and product tips for capturing those social media-friendly pics—get them all below!
BTC was onsite at the JPMS Hawaii Seminar where Editorial Director and award-winning stylist Noogie Thai (@noogiethai) led a session on everything from professional editorial work to shooting with a ring light. Here’s what we learned behind the camera lens with Noogie, Mary Cuomo (@cuomocreomeans) and Lucas Doney (@lucasdoney).
1. Avoid Overexposure
A ring light will help you directly reflect light onto hair, but overexposure will blow out any dimension or bright contrast in your client’s color. To avoid this, dim down the ring light so it’s not too bright and adjust the exposure manually on your phone instead for total control. You’ll also be able to play with different levels of shadows and highlights.
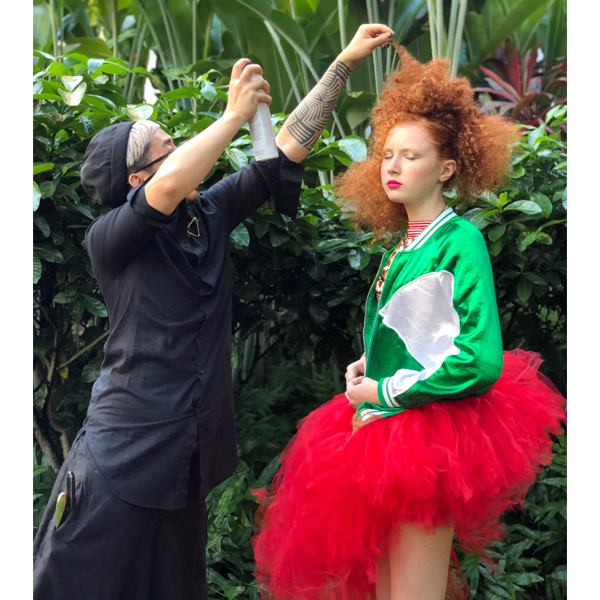
2. Adjust For Hair Type: Curls, Long Hair & A-Line Bobs
“Don’t just shoot through the (ring light) hole,” warns Noogie. “Use body position as a direction to point at what you want your audience to look at.” Here are three tips for adjusting light and positioning to accentuate a specific texture or haircut:
- Curls: Adjust the light intensity so it strongly reflects light, defining every curl and individual bend in the hair.
- Long Hair: Have your client drop their shoulder down and lean their body over to one side so the hair falls forward to create expansion and a strong silhouette.
- A-Line Bobs: Have your client turn to show their profile, then try tilting their chin down and head back to accentuate the blunt line.
3. Don’t Overuse Product
“The less amount of finishing product the better when shooting with a ring light,” shares Noogie. Why? Ring lights are a direct source of light that create shine on the hair, so applying too much hairspray can appear as greasy on camera.
Before taming flyaways with product, photograph the hair because sometimes the ring light will blur them out. If that’s the case, applying product on them will actually create a reflective light on the frizz and work against you.
Here’s are the two products Noogie always keeps in his styling arsenal on-set:
Products Used
4. Work Through The Camera Lens
Don’t assume the hair will photograph the way it looks in person, or make adjustments based on what it looks like directly in front of you. “Look at the hair through your phone instead of relying on the naked eye,” shares Noogie. Then, see how the hair fills the space and find the right distance to capture the entire look without showing excess background or cropping the hair.
More from
John Paul Mitchell Systems
-
Manufacturer
John Paul Mitchell Systems Launches Sustainable Restage Of Tea Tree Line
-
News
Pick The New Paul Mitchell Colorways Shade—Here’s How!
-
Monthly Product Launch List
11 New Game-Changing Hair Launches To Add To Your Arsenal
-
Hair Color
Lime Green-Toned Color Block
-
Color Depositing
Clean Beauty Color Depositing Treatment
-
Hair Color
Vivids: 6 Creative Color Placement & Formulation Tips
-
Industry News
Remembering The Life of Angus Mitchell
-
Monthly Product Launch List
The Best Hair Product Launches Of Fall 2023
-
Manufacturer
John Paul Mitchell Systems® Launches New Pro Rewards Program
-
News
These Are The Hottest Hair Launches To Close Out Summer 2023
-
Events
Paul Mitchell’s New Colorways Contest Is Live
-
Hair Color
BTC Exclusive: Fern the Barber Leads John Paul Mitchell Systems Colorways Launch
-
Heat Protection
Hot Off The Press Thermal Protective Hairspray
-
Hairsprays
Neuro Protect HeatCTRL® Iron Thermal Protection Hairspray
-
News
The Hottest Hair Product Launches Of Summer 2023
-
Hair Color
Platinum Plus Toning Drops
-
Haircare
Platinum Plus Shampoo
-
Industry News
John Paul Mitchell Systems® Appoints Senior Director Of Sustainability
-
Demi-Permanent Color
The Demi Reds Collection
-
Chain Salons
John Paul Mitchell Systems® Partners With Nonprofit “Bees For Development”
-
Manufacturer
John Paul Mitchell Systems® Appoints Stephen Moody as Artistic Director
-
Celebrity
Celeb Stylist Cesar DeLeon Ramirez Spills His Secrets
-
Blonde
10 Ways To Service Your Textured Clients
-
Industry News
Paul Mitchell Appoints New CEO & Artistic Directors

