
4 Tips For Balayaging On Fine/Damaged Hair

4 Tips For Balayaging On Fine/Damaged Hair
When a client comes in with damaged strands, applying lightener is the last thing on your mind. But if she’s determined to brighten her locks, it turns out there are ways to give her that subtle sun-kissed glow she craves without causing major damage that’s beyond repair—and we got the answers straight from Jamie Sea (@prettylittleombre)! Find out her four tips for balayaging on fine/damaged hair below!

1. Don’t Be Scared Of Heavy Placement
While it feels like heavy saturation will only lead to more damage, Jamie says balayage is the most gentle approach to highlighting. Just be sure to not push the lightener too hard into the hair because it can result in harsh lines!
Pro Tip: Your technique is only as good as your tools and Jamie’s go-to is the balayage brush from The Paint Pack. It’s great for heavy saturation, instant blur and a super fast application—and you can get yours today in the BTC Shop!
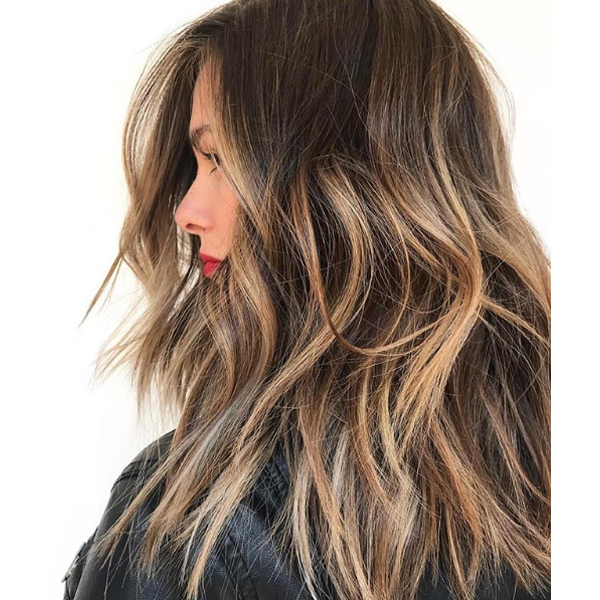
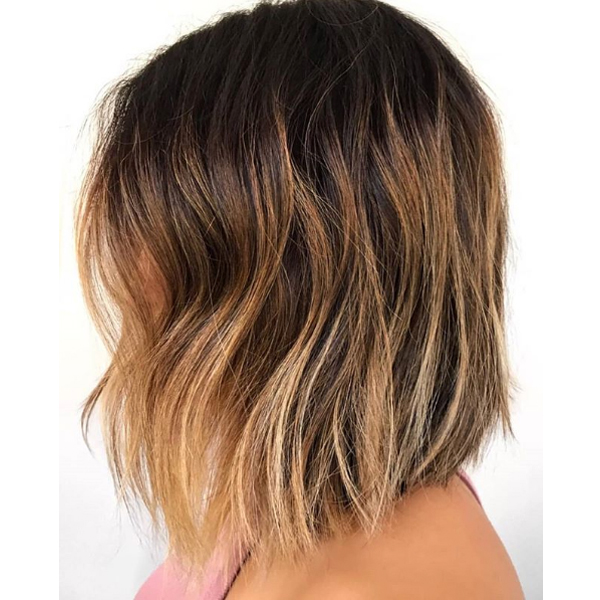
2. Opt For Balayage “Singles”
This technique offers even coverage from roots to ends for a ribbon highlight effect that looks super natural. An added bonus? There are no demarcation lines and the grow out is oh so seamless for clients. Questioning whether or not this technique will cause stripes? Check out the before and after below from Jamie to see how seamless of a blend it is:
Pro Tip: You can totally customize the singles! Keep sections super skinny for a lighter ribbon effect or take them a little bit wider for a heavier end result. (Click here to learn more about balayage “singles”!)
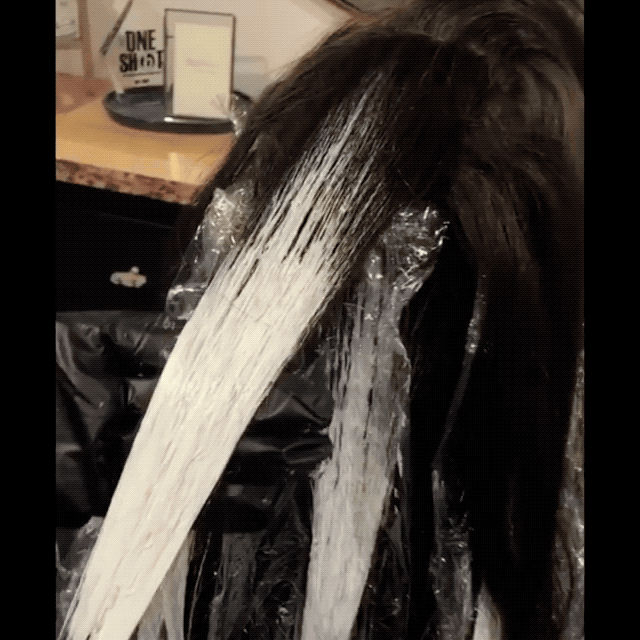
3. Or Try Open-Air Surface Painting
This balayage technique is a healthier way to brighten the hair, making it ideal for clients who have damage but want an all-over glow because only the surface of the hair is saturated, not the underneath area. (Click here for the three things you should know about surface painting!) Check out how it should look in the gif below:
4. Elevation Matters
Remember this: elevation plays a big role when painting up toward the scalp. So maintain a higher elevation to help you paint closer to the scalp and a lower elevation for perfectly painting the midlengths to the ends.
Products Used

More from
Jamie Sea
-
#THEBTCSHOW 2018
5 Tips For Dimensional Haircolor From Redken
-
Balayage
Brunette Balayage: 4 Common Mistakes + How To Avoid Making Them
-
Balayage
@prettylittleombre’s 7 Golden Rules For Beautiful Balayage
-
Balayage
Say NO To Blorange Balayage—Here’s How
-
Balayage
3 Mistakes That Will Ruin Your Balayage
-
Balayage
6 Face-Framing “Money Piece” Formulas
-
Balayage
Updating Balayage for Fall: High-Contrast Dimension
-
Balayage
Face-Framing Balayage by @prettylittleombre
-
Balayage
@prettylittleombre’s Dimensional Balayage + Money Piece
-
Balayage
WATCH 2 Balayage Insta Stars Create High-Contrast Dimension
-
#thebtcshow Austin 2017
3 Balayage Bosses Share Their Tricks
-
#thebtcshow Austin 2017
The Behind The Chair Show 2017: Day 3
-
Balayage
Balayage Surface Painting: 3 Things To Know
-
Business
Start Taking Insta Pictures Like A Pro: 3 Tips From @prettylittleombre
-
Balayage
3 Tips To Slay The Blend
-
Balayage
3 Balayage Problems—Solved!
-
Balayage
@prettylittleombre Swears By These 5 Glossing Formulas
-
Balayage
5 Go-To Glossing Formulas From @prettylittleombre
-
News
The BTC #Squad Spills It All: Color Melts, Balayage & Going Platinum
-
Balayage
3 Bright & Bold Balayage Tips From @prettylittleombre
-
Balayage
Gorgeous Balayage + Stretched Root
-
Events
BTC “On Tour” Takes LA
-
Balayage
@prettylittleombre’s Pyramid of Fundamentals For Client Retention
-
Balayage
How-To: Heavy Balayage, Level 5 Base

