
4 Styles Your Brides Will Fall in Love With
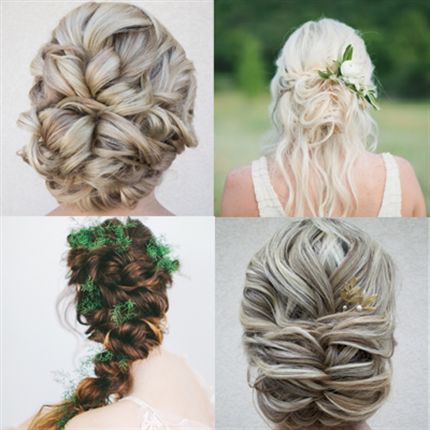

By now, she’s well on her way to planning the perfect wedding. She’s sourced her rustic, antique lanterns; bouquets of crimson calla lilies and fall foliage for those charming tableaux at the reception. Still on the drawing board, however, is her hairstyle. If you need inspiration, you’ve come to the right place. BTC Bridal Expert Stephanie Brinkerhoff rounds up some of her favorite styles, and whether your bride prefers tousled or polished, here are some irresistible choices.
Polished Curls
Loose, messy waves are still having a moment, but not every bride wants to look like she just stepped off the beach. These polished curls are the perfect compromise—great for the bride who wants to look sophisticated but not stiff or overdone.
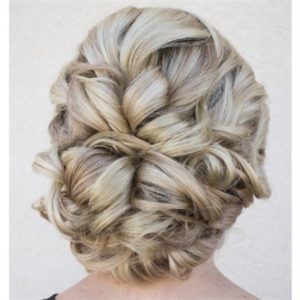
1. Starting at the nape, begin curling the hair with a 1- or 1½-inch curling wand. Add hairspray, and backcomb if the hair is too sleek or slippery.
2. Work up the head, curling the hair roots to ends in alternating directions.
3. Once all of the hair is curled, clip away the top and sides.
4. Use the back to create the updo base. Create a low ponytail, then begin pinning the curls around the tail.
5. Release the top and sides and incorporate them into the base.
6. As you pin the top and sides, use pomade or shine serum to smooth out individual curls, making them defined and sleek. Work with small sections for a more intricate look.
7. Pin all of the hair into the base in this manner and finish with hairspray.
Lovin’ These Looks?!
Get More How-Tos from Steph Here!

Mother Nature
She’s part flower child, part goddess, and this intricately-laced Boho braid is the perfect way to express her free spirit. Plus, the voluminous texture of this twist photographs beautifully, making it a no-brainer for wedding albums!
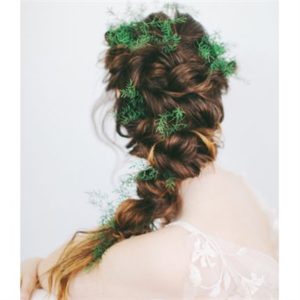
1. Subdivide the hair into two sections by creating a part from ear-to-ear across the top of the head.
2. Secure the crown to maintain volume as you braid.
3. Using the sections in front of the ears, create rope braids that begin at the part and continue down each side of the head, meeting in the back. Secure with bobby pins just below the crown.
4. Beginning on the right side by the ear, loosely twist a large section of hair. Work across the back of the head, and secure with pins by the opposite ear.
5. Repeat this process, this time progressing from left to right. Continue twisting and pinning like this down the head until you reach the nape.
6. At the nape, create a rope braid, then loosen and soften the rope by pulling on individual sections with your fingers.
7. Secure the bottom with a clear elastic.
Wild and Free
She prefers camping to room service, and this effortless-looking, half-up, half-down style is perfect for her outdoor celebration. Add floral embellishments in a nod to her love for the great outdoors.

1. Create relaxed waves with a flat iron or a 1-inch curling wand. If the hair becomes too curly, smooth it with the flat iron or stretch each curl before it cools.
2. Backcomb the roots at the crown for volume.
3. On the heavy side, create a loose French braid that begins off of the part, about 2 inches back from the hairline, then wrap it around to the back of the head.
4. Pin the end of the braid in the center back. Avoid flattening the crown.
5. Loosely scrunch the hair underneath the braid, and pin it in the center back. Don’t worry about being too uniform or precise, just scrunch and pin until the updo looks messy and relaxed!
6. Carefully sweep back the opposite side and pin it into the updo.
7. Finish by scrunching spray wax into the lengths for texture and hold.
Lovin’ These Looks?! Get More How-Tos Here!
Something Gold, Something New
Gold is always popular! Gilded tones are elegant and flattering! So why not incorporate this romantic element into her style with an elegant, gold hair accessory? This loose, braided upstyle provides the perfect canvas for a touch of glitz.
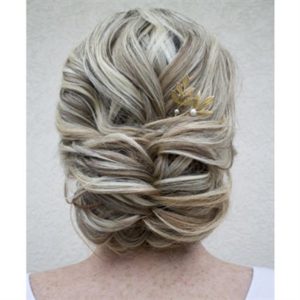
1. Curl the entire head with a 1-inch curling wand, starting at the roots for maximum texture and definition.
2. Apply spray wax after the hair is curled to encourage a beachy look.
3. In the center back, create a low, loose fishtail braid using hair from both sides of the head, omitting the hair in the center.
4. Continue braiding down the back of the head, using only hair from the sides, until you reach the nape.
5. At the nape, begin incorporating the hair from the center, until all the hair is incorporated into the fishtail braid.
6. Secure the bottom of the braid with an elastic.
7. Wrap the braid upward and tuck it underneath the hair at the nape, creating a loose updo. Secure with bobby pins and finish with hairspray.
8. Place a gold hair accessory on top of the updo, slightly off center.
More from
Stephanie Brinkerhoff
-
Bridal
4 Bridal Styling Mistakes & How To Solve Them
-
BTC University
Bridal Client Struggles? How To Book, Schedule and Handle Brides
-
Beachwaves
Boho Bridal Crown Braid
-
Bridal
8 Bridal Styles You Can Learn Right Now
-
Bridal
Bridal Stylists: 5 Tips For Working During A Pandemic
-
Beachwaves
7 Articles That’ll Take Your Styling Game To The Next Level In 2019
-
Bridal
5 Photography Tips That’ll Elevate Your Bridal Styles
-
Bridal
7 Tips For Perfectly Imperfect Bridal Styles
-
Bridal
Bridal Stylists: This Chart Will Make Consultations So Much Easier
-
Braids
@hairandmakeupbysteph’s Crown Braid
-
#thebtcshow Austin 2017
Want To Keep Your Blondes Blonde and Your Upstyles Solid? Read This…
-
#thebtcshow Austin 2017
The Behind The Chair Show 2017: Day 3
-
#thebtcshow Austin 2017
TRUMATCH by Daniel Alain at #thebtcshow
-
#thebtcshow Austin 2017
The Behind The Chair Show 2017: Day 2
-
#thebtcshow Austin 2017
Kenra Professional at #thebtcshow
-
Bridal
3 Bridal Style Issues: Solved
-
Bridal
5 Bridal Styling Tricks You Should Be Using
-
Bridal
Every Upstyle Should Start With This…
-
Braids
Beachy, Five-Strand Braid
-
News
The BTC #Squad Spills It All: Color Melts, Balayage & Going Platinum
-
BTC COLOR, Cut & Style Show
COLOR, Cut & Style 2016
-
Hair Extensions
BTC Exclusive! TRUMATCH Hair Extensions
-
BTC "On Tour"
BTC “On Tour” LA 2017
-
Bridal
How-To: 4 Upstyles For Wedding Season

