
3 Tips To Create A Watercolor Balayage
Low Contrast Balayage Using Your Client’s Natural Tones
For clients who like natural-looking dimension without drastic tonal changes, watercolor balayage is the way to go. The subtle shade range delivers a model-off-duty look to supplement the wash-and-go trends (and easy grow-out phase!) we’re hearing clients ask for. Keep reading for three pro tips on how to master this technique for your next client.
1. Build A Base With Lightener
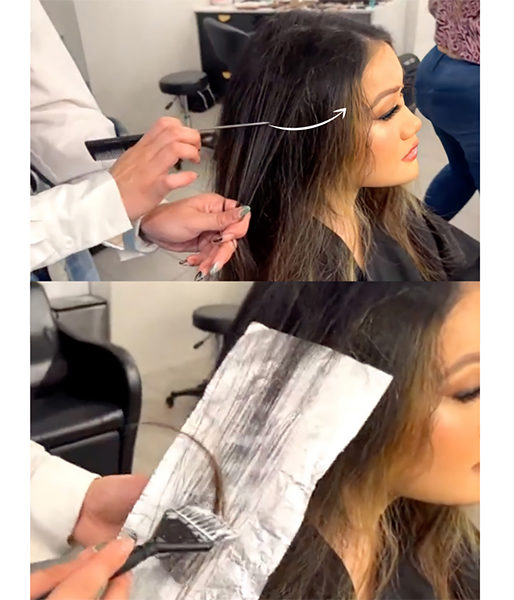
When lightening up your dark clients, precise placement is key to assure gradients pop without looking harsh. Alfaparf Milano National Artistic Director Cassie Siskovic (@cassiskovic) recommends starting with a tip-out around the head and adding a strong face-framing piece to build a lightened base before the watercolor balayage.
To create a balanced weight line, try this trick:
- Take a small section on the top of the head for an initial weave.
- Gently backcomb to soften the look for the low contrast effect.
- To identify where to begin painting your weight line, reference the client’s money piece. These sections should match up identically for a seamless blend.
Lightener formula: Alfaparf Milano BB Bleach High Lift 9 + 20-volume developer.
Want to try this technique? Enter to WIN $300 of Alfaparf products to recreate the look!
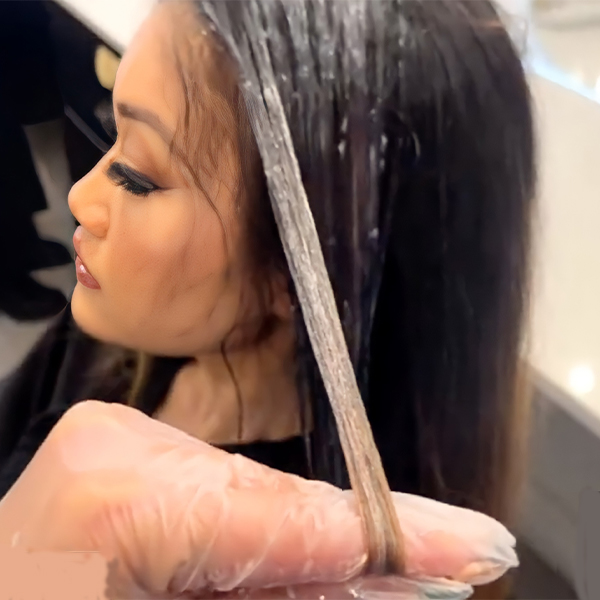
2. Use Multiple Formulas For The Watercolor Effect
Using three formulas will work together to create the diluted, seamless watercolor effect. Apply to damp or dry hair depending upon the level of deposit you’re looking for.
1. Formula A: 1:3 ratio with Alfaparf Milano Evolution Of Color³ permanent color cream shade 7.35 + 5-volume developer.
Apply about an inch away from the root and down to the midshaft. The formula ratio and low volume developer create the deepest tone in the balayage, adding depth and mimicking the client’s natural level. Pro Tip: Cassie recommends surface saturating this section. By lightly painting just the surface of the hair, you’ll create the beginning of a soft watercolor effect.
2. Formula B: Equal parts Alfaparf Milano Color Wear cream in shades 6.53 and 9.3.
Apply from where Formula A ended, blending down and overlapping formulas until just before you reach the ends.
3. Formula C: In an applicator bottle, mix Alfaparf Milano Color Wear Gloss Toner shade 0.823 + splash of 08.8.
Apply to the ends, being sure to fully saturate the porous hair. Then, blend up through Formula A and B to create the watercolored effect. “The more you overlap your formulas, the more watercolored it will look because you are blending all your formulas together,” says Cassie.
3. Check Blending During Process Time
Using three formulas after a lightening service for one client sounds daunting—but it’s actually quick and easy. The three formulas used will vary in level but carry a similar tone, making blending seamless and nearly fool-proof.
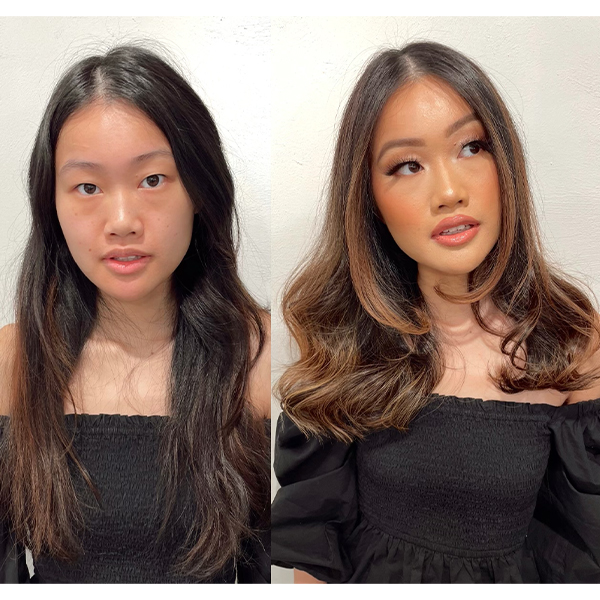
Check out this mid-process shot from Cassie’s client. See how the blend is already seamless before shampooing? This is exactly what you want your processing to look like when creating a watercolor balayage!
End result—a stunning, natural-looking balayage!
Your turn to try! Check out more low contrast tips here for your brunette clients:
This content is sponsored.
More from
Alfaparf Milano
-
Blonde
The Biggest Hair Color Trends of 2024
-
Blonde
Coverage In Dimensional Color: 3 Mistakes To Avoid
-
Balayage
Cowboy Copper Reverse Balayage Dos & Don’ts
-
BTC Events
BTC “On Tour” Nashville Recap: Everything You Missed
-
Celebrity
“Hairstyle: The Talent Show” Is Now Airing—Here’s What To Know
-
Events
4 Reasons You Need To Attend Alfaparf’s #LOVEYOUREVOLUTION Tour
-
Uncategorized
How To Formulate A Classic Golden Blonde Toner
-
Blonde
Warm Honey Blonde Curls
-
Blonde
4 Placement Tips To Create Depth When Blonding
-
Balayage
The Money Piece: How To Adjust For Natural Or Bold Balayage
-
Best Of 2022
10 Toning Tips You’ll Need in 2023
-
Balayage
5 Tips To Upgrade Your Cutting, Blonding & Styling Techniques
-
Industry Events
HairStyle: The Talent Show—Enter To Win This TV Contest!
-
BTC Quickies
5 Quickie Hair Cheats We Stole From Instagram
-
Awards Shows
Alfaparf Milano Announces Colorist of The Year 2022 Winner
-
Balayage
How To “Fake” A Full Foil—Try This Genius Trick!
-
The BTC Show
#THEBTCSHOW 2022
-
Facebook Lives
3 Hacks For Coloring Rich Copper Curls
-
Curls
4 Tips For Defined Curls To Try Right Now
-
Foilayage
4 Foilayage Placements for Brighter Blends
-
Brunette
Semi di Lino Brunette Anti-Orange Conditioner
-
Brunette
Semi di Lino Brunette Anti-Orange Low Shampoo
-
Glossing/ Toning
Color Wear Gloss Toner
-
Brunette
Watercolor Brunette

