
3 Tips For Styling With Clip-In Extensions

Tips For Creating Festival Braids & Bridal Styles With Clip-In Extensions
Extensions are the secret weapon for creating Pinterest-worthy braids and updos. But here’s the thing, not every client wants to commit to the maintenance of tape-ins or other longer-term options—especially when they only need the added length and density for a single event. That’s where clip-in extensions come in. Below, we’re sharing three tips from BTC Team Member and Hairdo USA’s 2019 Stylist Grand Prize Winner Shayla Robertson (@samirasjewelry) that’ll help you when styling with clip-ins!
Every year, Hairdo USA launches their Hairdo Stylist contest which gives pro stylists and students a chance to showcase their best hairstyling work. The Grand Prize winner gets a three-day trip to Miami, a photo shoot with the Hairdo and Pink Pewter teams, a surprise Hairdo product shipment every month for a year AND a Pink Pewter gift basket valued at $500. Want to enter next year? Stay tuned because entry dates will be announced later this year!

Products Used
1. The Proper Way To Prep
Fine, silky strands means those clip-in extensions will slip right out the minute you start styling. So prep should focus on adding texture into the hair so the extensions have something to grip. Shayla starts with the Sexy Hair Texture Lock Pro Ceramic Crimper. From there, working section by section, she’ll apply Big Sexy Hair Powder Play Lite Soft Volumizing & Texturizing Powder directly at the root followed by some light backcombing.
2. How To Keep Them Hidden
The secret to keeping the extensions hidden is being strategic with your placement. Shayla’s advice? “Place them where you need them.” So if you’re creating a downstyle with a center part and braids on either side, don’t clip an extension directly in the middle because it’ll peek through. Also, whenever pulling sections back, grab them at an angle so the base of the clip-in isn’t exposed.
Pro Tip: Shayla likes to add chemical-free pops of color to her styles with Hairdo USA’s 6-Piece Straight Color Extension Kit. Not only are they quick to apply but they require zero commitment and won’t damage your client’s strands.

3. What To Do With Short Hairs Peeking Through
Shorter lengths tend to have a harder time blending in with the rest of the style so Shayla recommends three tactics for taming them: Curl the hair before building the style, use bobby pins when finishing up the style OR, depending on the look, only incorporate the extensions. Allow us to explain:
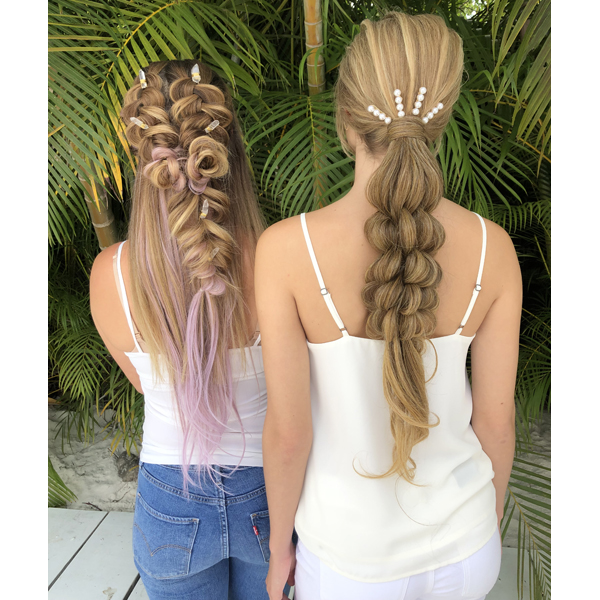
- When creating her banana bushel braid, Shayla starts by gathering her client’s hair into a ponytail and clipping in the 23″ Long Wave Pony from Hairdo USA.
- From there, she splits the pony in two—the bottom pony includes all of her client’s natural hair + half of the extensions while the top pony is the other half of the extensions.
- Then, when incorporating sections from the bottom pony to the top, Shayla only grabs the extensions. The natural hair will later be hidden when she secures her first elastic. (Check out the gif below to see what we mean!)
Click through the slideshow to get a peek at what went down at the Hairdo It Girl photo shoot in Miami!
Watch how it’s done! TAP HERE to see how Shayla created two braided downstyles with extensions!
More from
Hairdo
-
Styling
4 Tips For Getting The Perfect Photo of Bridal Styles
-
Hair Extensions
Human Hair Invisible Extension
-
Beachwaves
Watch: Bohemian Crown Braid Using Clip-In Extensions
-
Braids
Watch: 2 Braided Downstyle Tutorials With Extensions
-
Hair Extensions
23″ Long Wave Pony
-
Best of 2018
The Extension Education You Need Before 2018 Ends
-
Styling
Want To Win A Trip To Miami + New Products Every Month In 2019? Read This.
-
Hair Extensions
6-Piece Straight Color Extension Kit
-
Beachwaves
Elevated 3-Strand Braid + Low Ponytail
-
Beachwaves
Watch + Learn: Clip-In Extension Application + Infinity, Dutch & Fishtail Braiding Techniques
-
Styling
Showcase Your Styles For A Chance To Win BIG!
-
Hair Extensions
Hairdo 10-Piece Straight Human Hair Extension Kit
-
Hair Extensions
Cheat Long Blonde Locks
-
Hair Color
Hairdo Wigs
-
Braids
BOHO BRAID
-
Hair Extensions
Invisible Extension
-
Events
The 20 Coolest Things From CosmoProf North America
-
Hair
Color Splash Pony Pink
-
Buns
How-To: Braided Color Splash Chignon
-
Hair
Elegant Updo by Ken Paves for Hairdo
-
Hair
Urban Chic by Ken Paves for Hairdo
-
Hair
Undone Perfection by Ken Paves for Hairdo
-
Hair
Flirtatious Bangs by Ken Paves for Hairdo
-
Hair
Playful Pony How-To by Ken Paves for Hairdo

