
3 Secrets For Invisible Extensions (Even On Ponytails!)

Three Application Tips For Seamless Extensions
Ever wonder how you NEVER see a hair extension bond showing in pics of your fave celebs or IG models? The answer is simple: Custom keratin applications installed strand by strand.
1. Mix & Match Bond Sizes
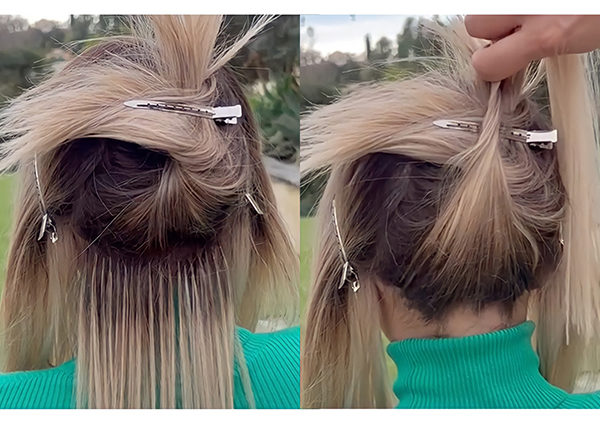
If you struggle with disguising extensions in certain areas of the head, you’re not alone. The key is customizing the bond size to match your client’s hair density—even in sparse areas. To figure out the right bond sizes for a custom application, assess where your client’s hair density changes in different sections of their head.
During the consultation, pay special attention to the hairline, around the ears and nape and near the top where the client parts their hair. Doing things like pulling their hair up in a ponytail or tucking it behind their ear how they prefer will help you visualize which bond sizes you’ll need for proper coverage. Once you’ve chosen the correct bond sizes, just cut them to size! Great Lengths Keratin Extensions are easy to customize because the bonds aren’t held together by glues or plastic so cutting can be super precise and mess-free.
Here’s a sizing rule of thumb:
Micro Bonds: Best for hairline applications—these are the smallest and most undetectable bonds that will volumize sparse areas
Custom Bonds: Perfect to fill in tight corners or areas that need extra coverage where density is lighter to build out the thickness
Mini Bonds: The most commonly used bonds, great for transitioning sections to a new bond size (larger or smaller) for a seamless blend
Standard Bonds: Best to use in the back of the head where density is greatest—these bonds are the largest and should never be used near the hairline
Pro Tip: Keep a few pre-cut keratin extensions in various bond sizes at your station during a consultation. You’ll be able to show your clients how seamless their extensions will be AND give yourself a visual of which bonds you’ll need to prep.
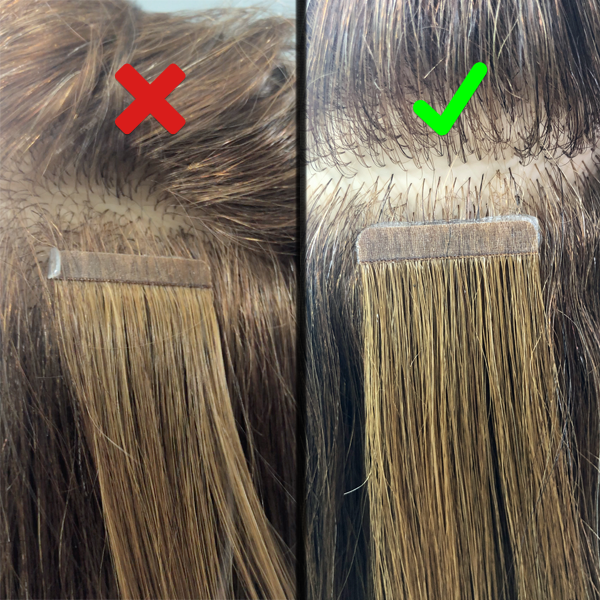
2. Remember The Hairline Includes The Nape
It’s pretty common when we’re thinking about the hairline we forget that means the nape, too! Always put as much attention to detail around the ears and through the nape as you do around the face.
You want your client’s extensions to be invisible in any style, not just when hair is down or pulled back in the front. To achieve this, use micro and custom bonds around the entire hairline. Micro bonds are the most undetectable to the eye while custom bonds add a little bit more volume to blend into your client’s natural texture.
Pro Tip: You should be able to (gently) move every single extension 360 degrees. After application, pinch the bond at the root and try to move it in a small circle. This should not cause any tugging, redness or discomfort to your client—if it does, the bond is too tight against the scalp risking damage to the natural hair.
Would your clients love keratin extensions? Get certified this year!
3. Be Strategic About Color Selection
Now that you know how to customize bond sizing and placement, let’s talk custom color section. For clients with heavy-rooted color, be conscious of what extensions you’re putting through their crown, part and hairline.
Keep in mind—you can always customize bonds to client’s color requests by pre-blending two tones of bonds together. If your client wanted to try a highlighted look, pre-blend a custom size bond that matches their base color with a micro bond of a highlighted color. This will give a subtle pop of brightness while still blending into the root.
Check out this length transformation—notice the seamless color blend from the root through the ends!
View this post on Instagram
Having trouble with your tape-ins? These 6 tips can correct the most common mistakes!
This content is sponsored.
More from
Great Lengths
-
Hair Extensions
6 Tips For The Flat Iron Waves Clients Want
-
BTC Hair Trend Report
VANESSA HUDGENS’ BRAIDED SPIKY BUN AT THE 2023 MET GALA
-
BTC Hair Trend Report
ASHLEY GRAHAM’S FLIPPED-OUT BOB AT THE 2023 MET GALA
-
BTC Hair Trend Report
Lily James’ Met Gala Twisted Bun + Piecey Fringe
-
Hair Color
Chemical-Free Money Piece? Here’s How!
-
New Appointments
Great Lengths USA Appoints Justine Marjan As Brand Ambassador
-
Celebrity
Met Gala 2021: See The Best Celebrity Hair & Beauty Looks!
-
Celebrity
Jennifer Lopez’s Western-Inspired Ponytail
-
Blonde
Hilary Duff’s Creamy Blonde
-
Facebook Lives
Make More Money With This Extension Tip!
-
Hair Extensions
GL Pre-Bonded
-
Hair Extensions
GL TAPES+
-
News
Nine Zero One Salon Celebrates 10-Year Anniversary
-
Hair Extensions
4 Tape-In Extension Styling Must-Dos
-
Hair Extensions
6 Tape-In Extension Mistakes And How To Fix Them
-
Hair Color
Watch: Tape-In Extension Application For Chemical-Free Color
-
Best of 2018
The Extension Education You Need Before 2018 Ends
-
Hair Extensions
Asymmetrical-Twisted Updo
-
Braids
Video How-To: Tape-In Extension Application, Blending & Romantic Braid Styling
-
Hair Color
Coloring Tape-In Extensions: 3 Questions And Answers
-
Hair Extensions
5 Before-And-After Extensions Transformations You Have To See
-
Hair Extensions
Tape-In Extensions: 5 Things You Can’t Forget
-
#THEBTCSHOW 2018
Co-Lab Styling at #thebtcshow 2018
-
Hair Extensions
Tape-In Extensions: 4 Tips For The Most Undetectable Finish

