3 Braiding Tips For Maintaining Tight Tension

Braid Education: 3 Tips For Creating The Perfect Stitch
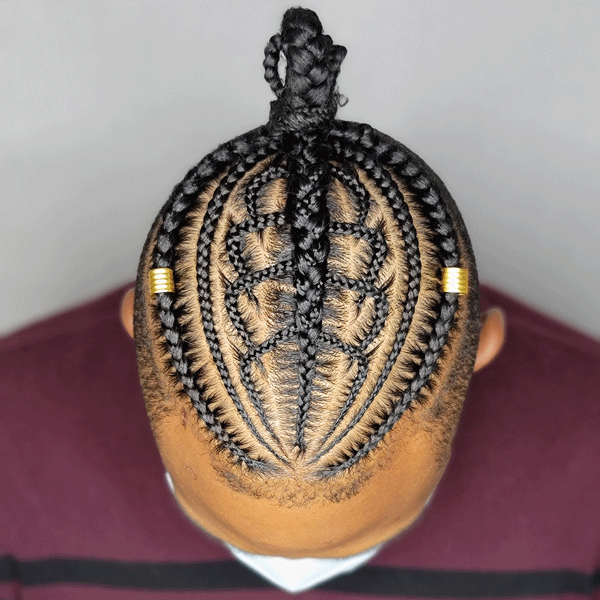
Loose, bubbled braids got you down? From basic cornrows to intricate designs, braiding can be an intimidating technique to perfect. That’s why we had expert braider Pati Plymire (@queenofthesouth512) teach her braiding techniques on BTC University and she broke it ALL down.
Scroll down to learn everything from creating clean partings to avoiding braid bubbles and her go-to advice for at-home care. Want to learn more? Click here to receive unlimited access to Pati’s class on BTC University!

What We Learned:
You can learn Pati’s full technique in her 90-minute course, but we’re teasing these tips you need to know now!
Tip #1: Measure With A Comb To Create Uniform Sections
To create clean, even sections, Pati uses the tail end of her rattail comb and her finger as a ruler, for measuring section size. “It’s a real simple trick, but it makes life so much easier when creating subsections. This way, I don’t have to guess if the sections are the same size,” she explains.
- Create a rough layout of where sections will be placed.
- Take the end of the rattail comb and gently enter it into a subsection until it starts to peek out on the other side. Use your pointer finger as a placeholder to mark how far into the section the comb is.
- Keeping your finger in place, remove the comb and repeat the step in a different section, measuring the width with your finger. If the sections don’t match, just add or remove hair.
- For a symmetrical design move to the corresponding subsection.
- For a design with uniform sections, use the same key for every subsection.
Tip #2: Maintain Tight Tension With These 2 Tips
Tension is key to avoiding loose braids. So, Pati shared her two go-to tricks for keeping tension tight and ensuring braids don’t bubble up.
#1: Before incorporating hair into a braid, Pati gently lifts the unbraided subsection up and back. Why? “Pulling the hair up and back gives the section some tension right from the start. It also helps me get a clean view of the hair I am picking up to add,” she explains.
#2. When adding, Pati avoids taking a full horizontal parting across the subsection. Instead, she only picks up half, saving the other half for adding to the other side. This gives her more control and also creates the cool stitching pattern seen in her designs.
Pro Tip: To avoid bubbles, gently smooth out the strand of hair when incorporating it into a section. “When I pick this hair up and add it to my fingers, I smooth it all the way to the ends. This helps avoid bubbles when braiding and also keeps everything smooth so the braids aren’t frizzy,” she explains.
Tip #3: Avoid Twisting To Keep Braids Flat & Creating Unwanted Discomfort
To keep designs flat and lump-free, Pati treats the feed-in braids like additional strands being added to a section.
“It’s all about the correct placement,” she explains. “I line the braid up with the subsection I am adding into the larger braid and just treat it like an additional strand of hair,” she explains. “The main key is to keep the smaller braid flat, treating it just like a horizontal parting. If you twist the braid and have the opposite side on top (the braid is on its side), not only does it create a lot of tension and discomfort on the scalp, but the braid will be lifted in that area.
Slide For The Amazing Before & After
Have Questions? Pati Has Answers!
One of the benefits of watching a course on BTC University? Artists are able to answer your questions in REAL TIME! Here are some technical questions viewers had for Pati during her livestream:
Question: What at-home maintenance do you advise for clients?
Answer: “The most important goal for at-home care is keeping braids smooth and avoiding frizz. So, wearing a durag is the most important part of at-home care. I advise my clients to wear one for almost every activity, including working out and sleeping. An itchy scalp is common, but instead of scratching I suggest patting the scalp.”
Q: How long do you advise clients to wait in between appointments?
A: “I normally like my clients to wait two weeks after taking out their braids before coming back. This gives the head a little more breathing time, and it also gives the hair some time to go back into a natural growth pattern. Since I create such hard partings and they stay for weeks at a time, the hair will start to fall that way after a while, so giving the hair and the scalp some time without tension is important.”