
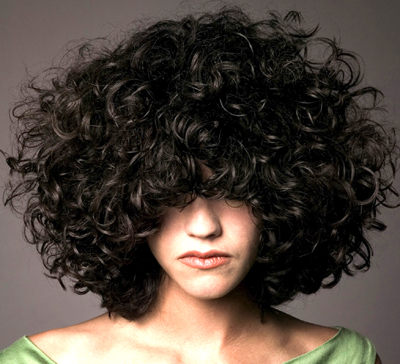
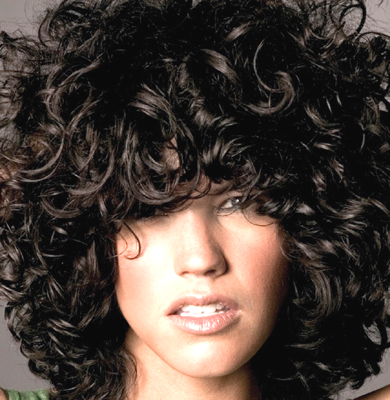
MOP Jennifer Step-by-Step

Advertisement
MOP Jennifer Step-by-Step
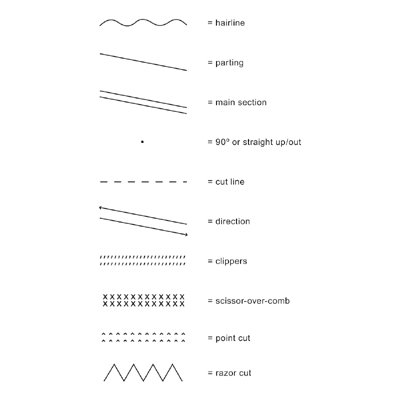
HOW-TO STEPS 
-
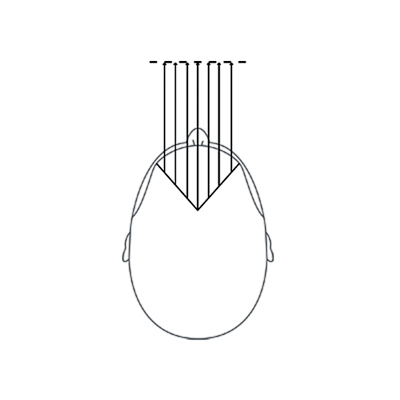 1
1Hold the hair straight in front of the section at 45 degrees and cut square.
Section The Hair On Top With 3 Sections
1. A classic fringe section.2. Divide the back into 2 sections using a central vertical section from the back of the fringe to the nape.
Creating The Fringe
1. Begin by taking horizontal subsections across the fringe section.2. Hold the hair straight in front of the section at 45 degrees and cut square, standing directly in front of the model.
3. Point cut to create a variable line.
Our guide to length is between the lip and the nose. Use deep point cutting for a loose and separated curl pattern.4. Continue with these sections standing in front of the model using point cutting on top of the previously cut guide.
5. Let down one side.
-
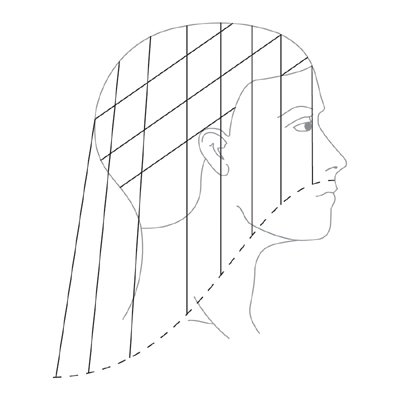
 2
2Over direct the hair forward and up to stationary guide.
Creating Graduation
1. Take a diagonal forward section parallel to the fringe section off or the center section.2. Over direct the hair forward and up to the outside edge of the fringe section pulling the hair toward you. Cut to the guide that was created by the previously cut fringe.
This is now your stationary guide. Point cut to create a variable line.
3. Take another slightly diagonal forward section parallel to the last and over direct the hair to the stationary guide. Extend the guide down as the amount of hair increases with the shape of the head.
4. Continue taking slightly diagonal forward sections parallel to the last on the entire half of the head working off the center parting.
5. Over direct hair to the stationary guide until you run out of hair.
6. Continue to extend the guide as needed to match the increase in hair as the sections lengthen.
-
 3
3Hold the hair up at 90 degrees and point cut a square layer.
Creating The Interior
1. Take a central vertical section from the crown to the front hairline.2. Hold the hair up at 90 degrees and point cut a square layer starting with the guide to length at the curve of the head in front.
3. Extend the section into the back and over direct the hair to 90 degrees straight up continuing the square layer.
Be sure to cut straight up at 90 and continue the guide making sure you do not round with the shape of the head. Your cutting line is parallel to the floor.
4. Take a vertical section at the ear and over direct the hair at 90 degrees straight up using the guide from the top.
5. Move to the back of that section and take another section parallel to the last, over direct up to 90 and point cut using the previous guide as well as the guide from the top.
Here we are using a traveling guide.
6. Take the remaining sections and continue to over direct 90 degree up parallel to the floor.
7. Work from the ear forward, take another vertical section and over direct the hair up to 90 degrees.
8. The guide comes from the center top along with the guide from the back.
9. Point cut in a square line.
10. Repeat the square layer on the other side remembering to stay square at 90 degrees straight.
-
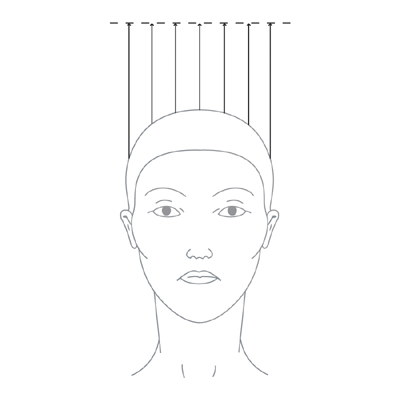
 4
4Using one fingers depth elevation hold the hair at natural fall and freehand a diagonal back line.
Creating The Perimeter: Extending the guide from the fringe at natural fall.
1. Take a diagonal back section 1-2 inches behind the front hairline.2. Using one fingers depth elevation hold the hair at natural fall and freehand a diagonal back line opening the area around the mouth and extending this diagonal back line toward the back.
Remember to stay at natural fall maintain the same diagonal back line into the back point cutting the line until you reach center back.The longest point of the hair is at the center back.
3. Repeat these sections on the other side beginning at the longest point in the fringe with a diagonal back section.
The Finish
For an optimal foundation product, use MOP C- Curl to enhance the curl while smoothing an over textured look to the curl.
Diffuse or air dry and finish with MOP spray Pomade for separation definition and shine.
-
 5
5 -
 6
6 -
 7
7
YOU MIGHT LIKE THIS
-
Hair
MOP Twiggy Step-by-Step
-
Hair
Mod Mop by TIGI®
-
Balayage

How To Enhance Naturally Curly Hair With Balayage
-
Curly
What a Curl Wants: How To Cut Curly Hair by Damien Carney
-
Blonde
Highlighting & Toning Curly Hair
TRENDING NOW!
-
Hair Color
WWYD: How To Stop Your 6N From Turning Orange
-
BTC Hair Trend Report
The Biggest Haircut Trends of 2024
-
Bobs
How to Avoid a Bulky Bob: 4 Techniques To Try
-
Glossing/ Toning
How To Achieve "Glass Hair": Smart Hacks From Hairdressers
-
Copper
What Is The "Cowboy Copper" Hair Trend? Here's What It Really Means...
-
Celebrity
10 BIPOC Celebrity Hairstylists Who Are Making Major Waves In The Industry Right Now
-
Curly
Long Layers: 10 Pro Tips + Common Cutting Mistakes
-
BTC Hair Trend Report
WWYD: How Hairstylists Are Navigating Inflation

