
Sidlab Fashion Forward Cropped Cut How-To

Advertisement
Sidlab Fashion Forward Cropped Cut How-To
HOW-TO STEPS 
-
 1
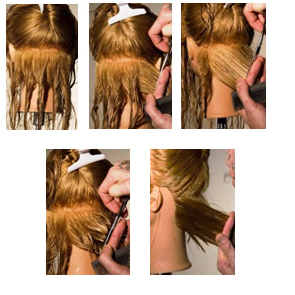
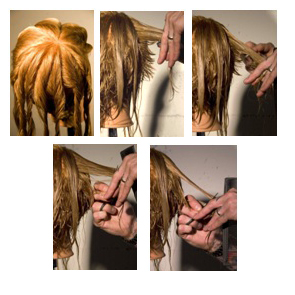
11. Make a horizontal parting from middle of the back of the ear to middle of the back of the ear and separate nape area into five vertical sub-sections.
2. Hold sub-sections 1 & 2 straight out at 90* and cut down following the head shape. How short should you cut? It’s up to you!
3. Laterally direct sub-section 3 to sub-section 2; use as your guide and cut down. Repeat with sub-section 4 using sub-section 3 as your new guide.
4. Laterally direct sub-section 5 straight back using sub-section 4 as your guide cut down protecting the weak area in the nape.
-
 2
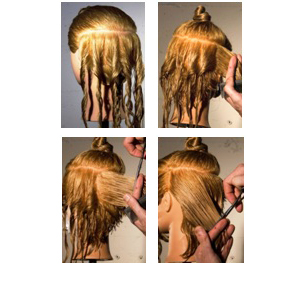
21. Part hair horizontally from recession to recession just below parietal ridge. Clip crown and top out of the way then separate back profile into 7 vertical sub-sections.
2. Cut sub-sections 1 & 2 straight out at 90-degree using the previously cut nape area as your guide.
3. Laterally direct sub-section 3 to previously cut section 2, elevate to 90-degree, finger angle 90-degree and cut down. Repeat cutting sub-section 4 using sub-section 3 as your new guide and sub-section 5 using sub-section 4 as your guide.
4. Condense sub-sections 6 & 7 then laterally direct them to sub-section 5 holding at 45-degree elevation and finger angle at 45-degree. Cut down to desired length while protecting the weak area at the nape.
-
 3
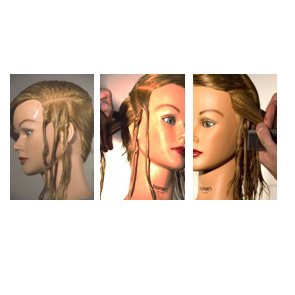
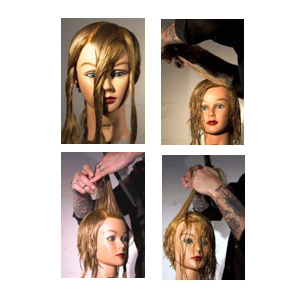
31. Continue parting from previous back area just below the parietal ridge through to the recession area. Section this area into 3 diagonal sub-sections from the back corner to the hairline.
2. Short Side: Using short layers from back top of ear as your guide, hold fingers parallel to the parting and cut from guide to fringe, to create softness on the face.
3. Long Side: How short you make this section is up to you.
Option A) Leave all length and weight by laterally directing each parting straight back and tying in at 45-degree elevation and finger angle
Option B) Cut as you did the short side leaving as much length, weight and softness on the hairline as you wish. -
 4
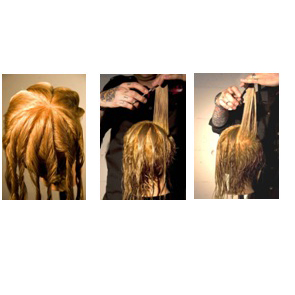
41. Take a parting from the top of the ears through the high point of the head separating the front from the back profile. Divide the back crown into 7 pie shaped sub-sections based off of the side part.
2. Elevate sub-section 1 straight up from its parting to 180-degrees. Cut at a 45-degree finger angle, short to long. (The shortest point or guide is your choice).
3. Over direct all sub-sections to the shortest point of sub-section 1 and cut at a 45-degree finger angle from short to long.
-
 5
51. Resection the crown area into 7 sub-sections
2. Using the previously cut back section as your guide, hold each sub section straight out from its parting and then using a razor or shears, cut underneath in a curved movement beginning at 90-degrees and completing the cut at 0 elevation.
NOTE: It is helpful to keep fingers pointing down to control the sections. Use a soft hand when removing under section and make sure to drop elevation while cutting to ensure that you do not cut off your length. You can always go back and take out more weight.
-
 6
6
1. Separate front top into 3 triangle sub-sections using the desired part as one side of the middle triangle.2. Over-direct the entire middle triangle section across the top of the head. Remember: The further you over direct, the more length and weight you will leave. Use the previously cut shortest hair from the crown as your guide, cut from short to long leaving length. Pick up second triangle on same side and repeat using previous sub-section as your guide.
3. Over direct the last triangle sub-section using the shortest piece of the center triangle as your guide. Cut short to long, leaving desired length.
YOU MIGHT LIKE THIS
-
Hair
Fashion Forward Cut from Sidlab Haircouture
-
Hair
Sidlab Haircouture Revitalizing How-To
-
Hair
David Cotteblanche’s Cropped Cut Styling How-To
-
Hair
Ted Gibson’s Tips for Cropped Cuts
-
Bobs
Cropped Bob with Square Fringe by Damien Carney for Joico
TRENDING NOW!
-
BTC Hair Trend Report
The Biggest Haircut Trends of 2024
-
Monthly Product Launch List
11 New Game-Changing Hair Launches To Add To Your Arsenal
-
Copper
What Is The "Cowboy Copper" Hair Trend? Here's What It Really Means...
-
Frizz
Straighten & Smooth 2A, Fine-Medium Density Hair
-
Copper
Muted Bronze
-
BTC Hair Trend Report
WWYD: How Hairstylists Are Navigating Inflation
-
Haircuts
SHAG 101: The Dos And Don'ts
-
Ask A BTC Expert
5 Foil Tips & Tricks From @the.blonde.chronicles

