
Keratherapy Formaldehyde-Free Pure Renewal Plus Smoothing Treatment

Advertisement
Advertisement
Keratherapy Formaldehyde-Free Pure Renewal Plus Smoothing Treatment
HOW-TO STEPS 
-
 1
1 -
 2
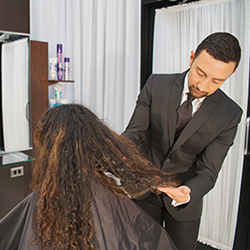
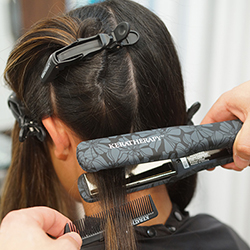
2Begin with a thorough consultation with your client. Be sure that the hair is healthy enough for a keratin smoothing treatment.
-
 3
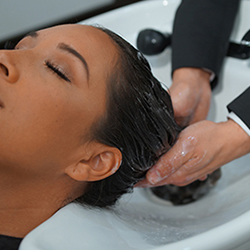
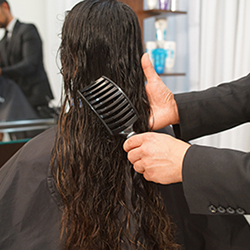
3Gently cleanse the hair with the Keratherapy Clean Start Pre-Treatment Shampoo. Work shampoo into a lather from roots to ends, being sure not to massage or scratch the scalp. Rinse well, then towel-dry and detangle with wide-tooth comb.
-
 4
4Blow-dry the hair until 75 percent dry. If you have clients with extremely coarse or resistant hair, blow-dry until 100 percent dry.
-
 5
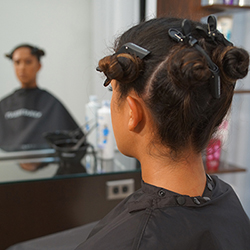
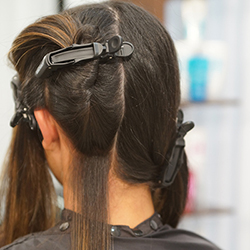
5Section the hair into 3-4 large parts.
Shake the bottle of Pure Renewal Plus very well and pour 1 to 1.5 ounces of the treatment into a color bowl. You can add more treatment to the bowl if needed, as you continue through the application process.
-
 6
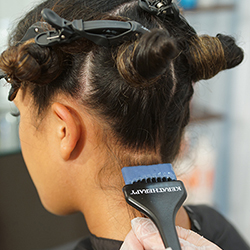
6Starting at the nape area, take small sections and apply Pure Renewal Plus with an applicator brush, dabbing from roots to ends. Massage the treatment into the hair. Comb the section of hair straight with a fine-tooth comb, making sure that all hair has been treated.
Continue this process until the entire head of hair has been treated. Be sure to avoid applying treatment to the scalp area. It is snot necessary to cover with a plastic cap or to apply heat.
Once all the hair has been treated, let the treatment process in the hair for 45 to 60 minutes. The timing depends on the texture and resistance of the hair and the desired end result.
-
 7
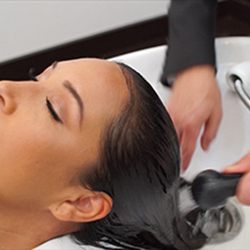
7After desired processing time is complete, rinse the hair with water for 10 to 20 seconds to remove the excess treatment. A small amount of the treatment must be left in the hair for the best results. Do not shampoo the hair.
-
 8
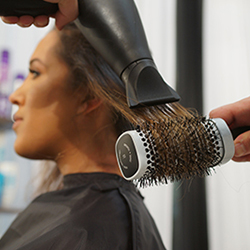
8Using a brush and blow dryer on medium heat, dry the hair completely straight and smooth until 100 percent dry. The blow-drying is a critical step and must be done properly to achieve the best results. The hair should be very smooth and straight before the flat ironing process begins.
-
 9
9Section the hair into 3 to 4 large sections. Begin the flat ironing process. It is extremely important to choose the correct iron temperature. This is determined by the hair and overall condition of the hair.
-
 10
10Starting at the nape area, take small sections and flat iron slowly and thoroughly until the hair becomes shiny and smooth. This will require multiple passes on the flat iron on each section. Pay particular attention to the resistant root area. “Tap” the iron at the roots to release any hot moisture and to not burn the scalp, and flat iron to the ends.
Continue this process until the entire head of hair has been flat ironed thoroughly.
-
 11
11
YOU MIGHT LIKE THIS
-
Blowouts
Keratherapy Extreme and Intense Renewal Smoothing Treatments
-
Haircare
Get a Grip On Unruly Texture
-
Blowouts
How to Straighten Virgin Resistant Hair from Bio Ionic® KeraSmooth™
-
Haircare
4 Steps to Smoother Hair
-
Blowouts

Express Foiled Blonde + Keratin Smoothing Treatment
TRENDING NOW!
-
BTC Hair Trend Report
The Biggest Haircut Trends of 2024
-
Monthly Product Launch List
11 New Game-Changing Hair Launches To Add To Your Arsenal
-
Copper
What Is The "Cowboy Copper" Hair Trend? Here's What It Really Means...
-
Frizz
Straighten & Smooth 2A, Fine-Medium Density Hair
-
Copper
Muted Bronze
-
Blonde
Conditioner Before Toner: Common Hair Myth Debunked
-
BTC Hair Trend Report
WWYD: How Hairstylists Are Navigating Inflation
-
Haircuts
SHAG 101: The Dos And Don'ts

