
Pivot Point’s Inspirations

Advertisement
Advertisement
Pivot Point’s Inspirations
HOW-TO STEPS 
-
 1
1She is tired of the sweet, “girl-next-door” look and wants a style that makes her stand out as an individual.
-
 2
2The exterior and the crest area of this asymmetrical style are sculpted using a slide cutting technique and multiple design lines on one side, which result in a length increase toward the back. The opposite side is sculpted with mobile design lines, creating consistent lengths.
-
 3
3In the interior, partings parallel to the center part, together with twisted distribution, are used to create more increase-layered lengths. The fringe is also asymmetrically increase-layered.
-
 4
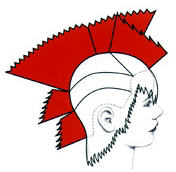
4STRUCTURE
Section a triangle from the apex to the recession corners. Section the back along the center and release a 1.5″ (3.5 cm) wide parting parallel to the perimeter hairline.
Take a vertical parting at the sideburn and project straight out. Position your fingers vertically and slide cut while gradually opening and closing the shears, creating a length increase toward the bottom of the parting.
Continue to take vertical partings. Work with multiple design lines, shifting each new parting to the previous one and sculpt with the same procedure. -
 5
5Continue to work until you reach the center back, using the same techniques. This results in a length increase toward the back.
Use a mobile design line as you work from the center back toward the opposite side. Be careful not to lose too much perimeter length as you work around the ear.
-
 6
6Use the point cutting technique to refine the perimeter and to create a steep diagonal-back line behind the ear on the shorter side, and a slight diagonal-back line on the longer side.
Release the fringe and section a diagonal-forward parting. Using the shortest lengths from the front hairline as a guide, distribute perpendicular and project at a low angle. Slide cut, gradually opening and closing the shears, to create a length increase toward the opposite side.
Using the first parting as a stationary design line, sculpt subsequent partings in the same manner.
-
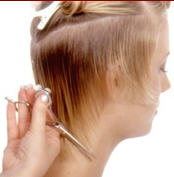
 7
7Subsection the hair at the top of the head into four vertical partings. Project one parting at 90° and position your fingers horizontally. Twist the section by walking to the client’s opposite side. Be sure that the center of the twist is in the middle of the parting to create equal length-increase toward the back and front. Then notch parallel to your fingers.
Repeat this procedure with the remaining partings, using the shortest lengths from the previous section as an approximate length guide.
-
 8
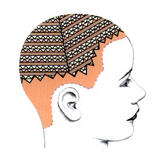
8Color Graphic: The art shows the zigzag line used to section the lower crest and the front hairline, which are colored with a level-9, copper. The base of the remaining interior is also colored with the same level-9 formula. Horizontal slices in the back and diagonal slices in the front are used to alternate a level-9, copper with a level-7, brown and lightener throughout the lengths of the interior.
-
 9
9Subsection the interior into quadrants. Use diagonal partings and weave before applying powder lightener with 10 volume (3%) developer throughout the lengths of the hair.
Then release another diagonal parting and section a fine slice to apply level-7, warm brown permanent color with 10 volume (3%) developer.
Finally, weave through the next parting to apply level-9, copper permanent color with 10 volume (3%) developer. Repeat this alternation pattern throughout the quadrants, then process, rinse and condition the hair before styling.
-
 10
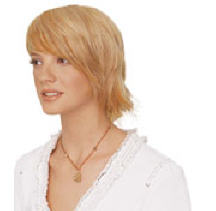
10FINISH
Apply light mousse and use a Denman brush to blow dry the hair.
CREDITS
Hair: Yolly ten Koppel, Pivot Point, the Netherlands
Colorist: Susan McFarland, Pivot Point International
Makeup: Lori Neapolitan
Fashion Styling: Kristy Piunti
(c) 2002 Pivot Point International, Inc.
(c) 2002 Design Forum
Photography: David PlacekFor more information please log on to: www.pivot-point.com
Check out a variety of Pivot Point items at http://www.behindthechairs.com/shopping/
YOU MIGHT LIKE THIS
-
Hair
Pivot Point’s InnovationKelli • Mini-Tech
-
Hair
Pivot Point International “Tinlei” Mini-Tech
-
Hair
Pivot Point International “Kitty” Mini-Tech
-
Hair
Pivot Point International “Lauren” Mini-Tech
-
Multi-Cultural
Pivot Point “Rosita” Mini-Tech
TRENDING NOW!
-
BTC Hair Trend Report
The Biggest Haircut Trends of 2024
-
Blonde
Conditioner Before Toner: Common Hair Myth Debunked
-
Monthly Product Launch List
11 New Game-Changing Hair Launches To Add To Your Arsenal
-
Copper
What Is The "Cowboy Copper" Hair Trend? Here's What It Really Means...
-
Frizz
Straighten & Smooth 2A, Fine-Medium Density Hair
-
Copper
Muted Bronze
-
Haircuts
SHAG 101: The Dos And Don'ts
-
BTC Hair Trend Report
WWYD: How Hairstylists Are Navigating Inflation

